In a previous post, we talked about how to use the shoreline and compass bearings taken on recognizable landmarks as Lines Of Position to determine our location. At the end of that post, I mentioned that when you’re away from the shoreline, you can use compass bearings alone to determine your position. Here’s a real-life worked example:
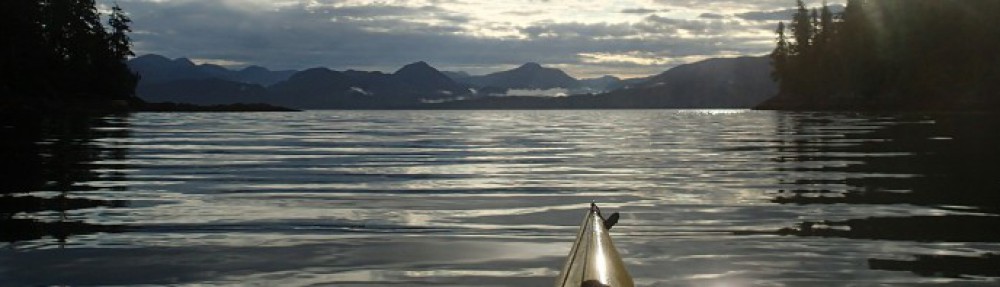
Recently, I was paddling in Ayyulshun’/English Bay and headed a bit out past Point Grey into the eastern edge of the Strait Of Georgia. Just for fun, and because the landmarks were nicely down sun for photos, I “shot” my position using my bow compass.
First, I aimed the bow of my kayak at the Point Atkinson Lighthouse. It’s the white upright object visible at the shoreline in the photo below. Looking at the red lubber line visible in the dome of my bow compass, we can see that the magnetic bearing to the lighthouse is 335° (or close enough to that for practical purposes). That gives us one Line Of Position.
Shooting a compass bearing using the bow compass of a sea kayak: With the bow of the kayak pointed at Point Atkinson Lighthouse, visible on the shoreline, the red lubber line gives us a reading of roughly 335° on the blue dome of the compass.
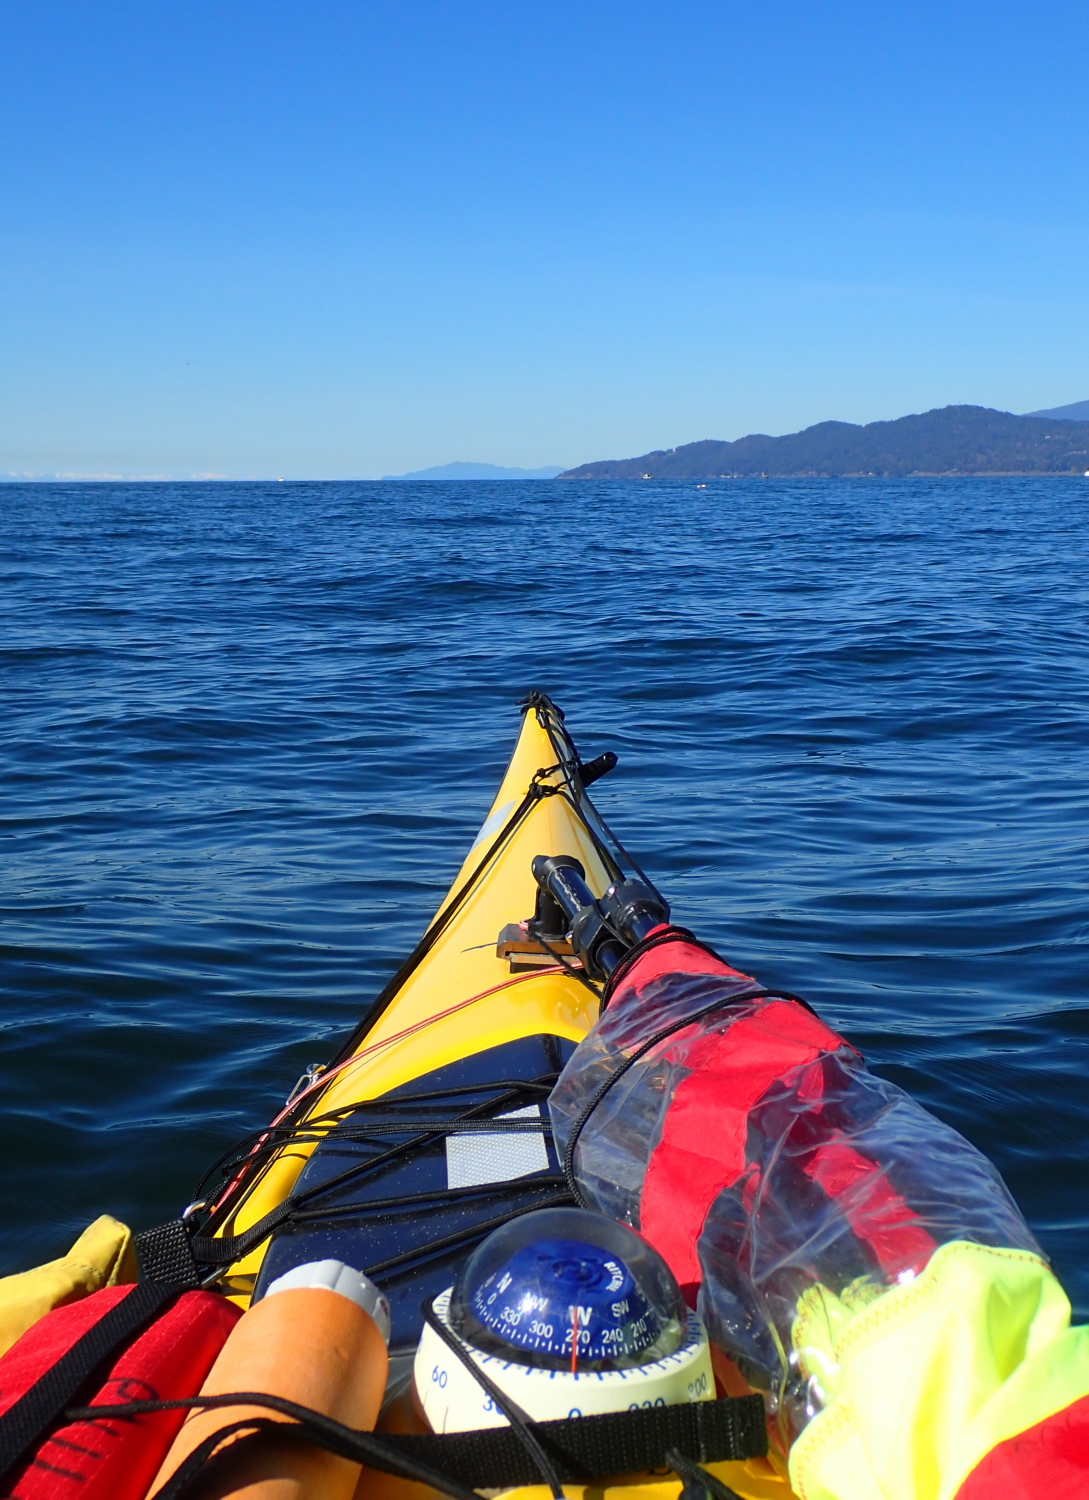
Next, I swung my boat to point at the southern end of Bowen Island. As you can see in the photo, the bearing to that point was about 272° magnetic.
Shooting a second line of position with the bow compass. With the bow of the kayak aimed at the southern tip of Bowen Island, we get a reading of roughly 272°
(From sheer force of habit, I automatically chose two landmarks that were—very, very roughly—90° apart from my point of view. As I’ve mentioned in previous postings, this is good practice, since it means that when you plot the corresponding LOPs on your chart, they’ll meet at a more-or-less right angle, which makes for a much clearer intersection point than an acute or obtuse angle.)
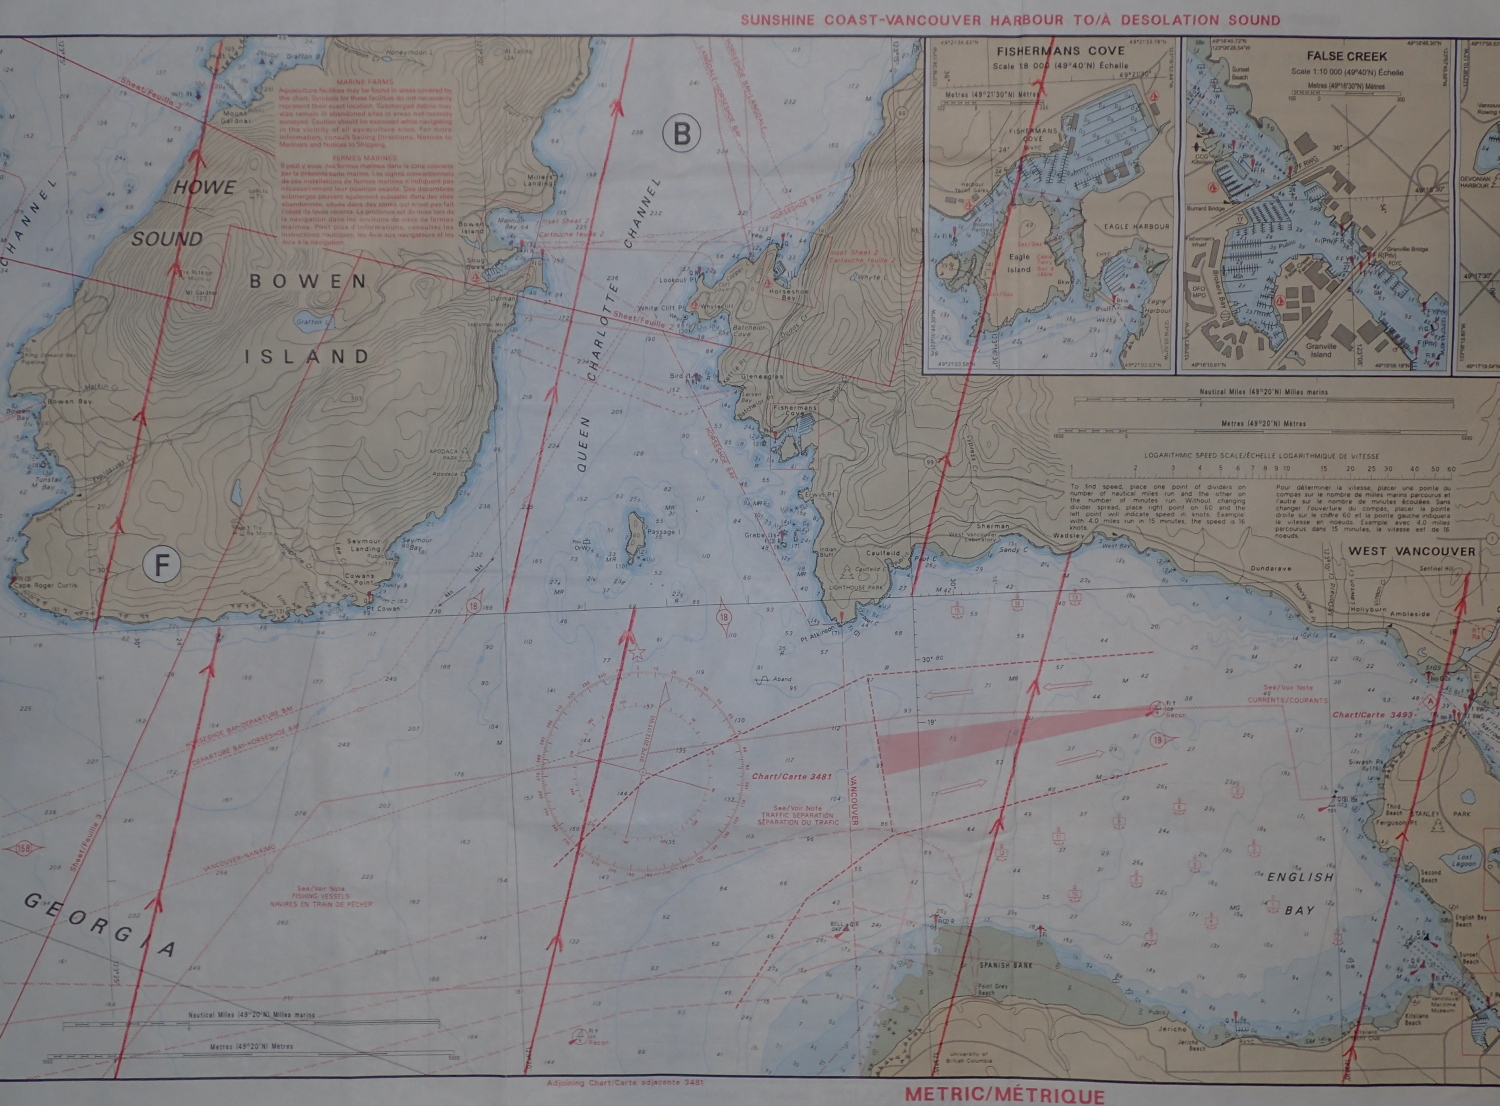
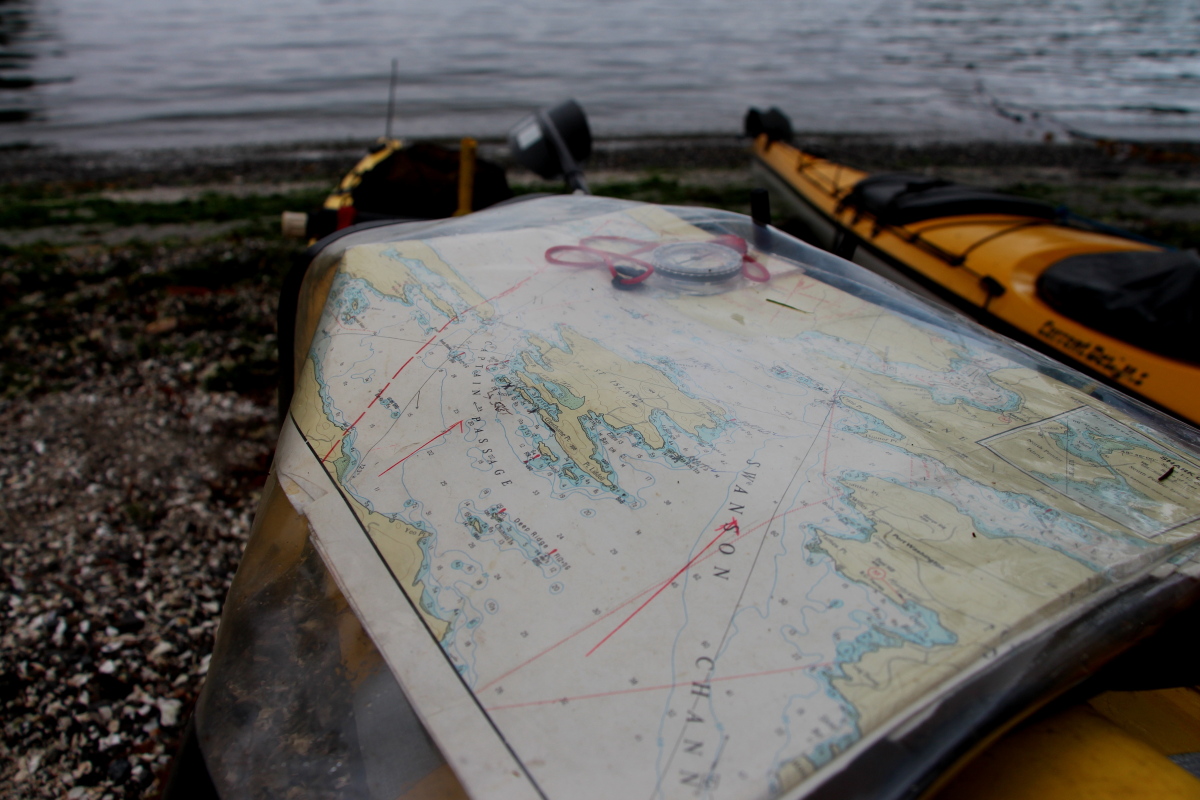
My chart of Ayyulshun’/English Bay. The thick red lines with arrows point to magnetic North. For why I’ve drawn them on my chart—and why you should do the same with your charts—check out this post.
While on board the kayak, pinning down my modified Davis protractor and pulling out the protractor string while simultaneously holding my camera above the chart case would have required more hands than I happen to be equipped with. So instead of plotting my position in real time while at sea, I opted to do so back at home, with a flat, unbagged chart and a camera tripod. (But since you—probably—wouldn’t be flailing around with a camera at the same time as you’re navigating, you can work your plot at sea.)
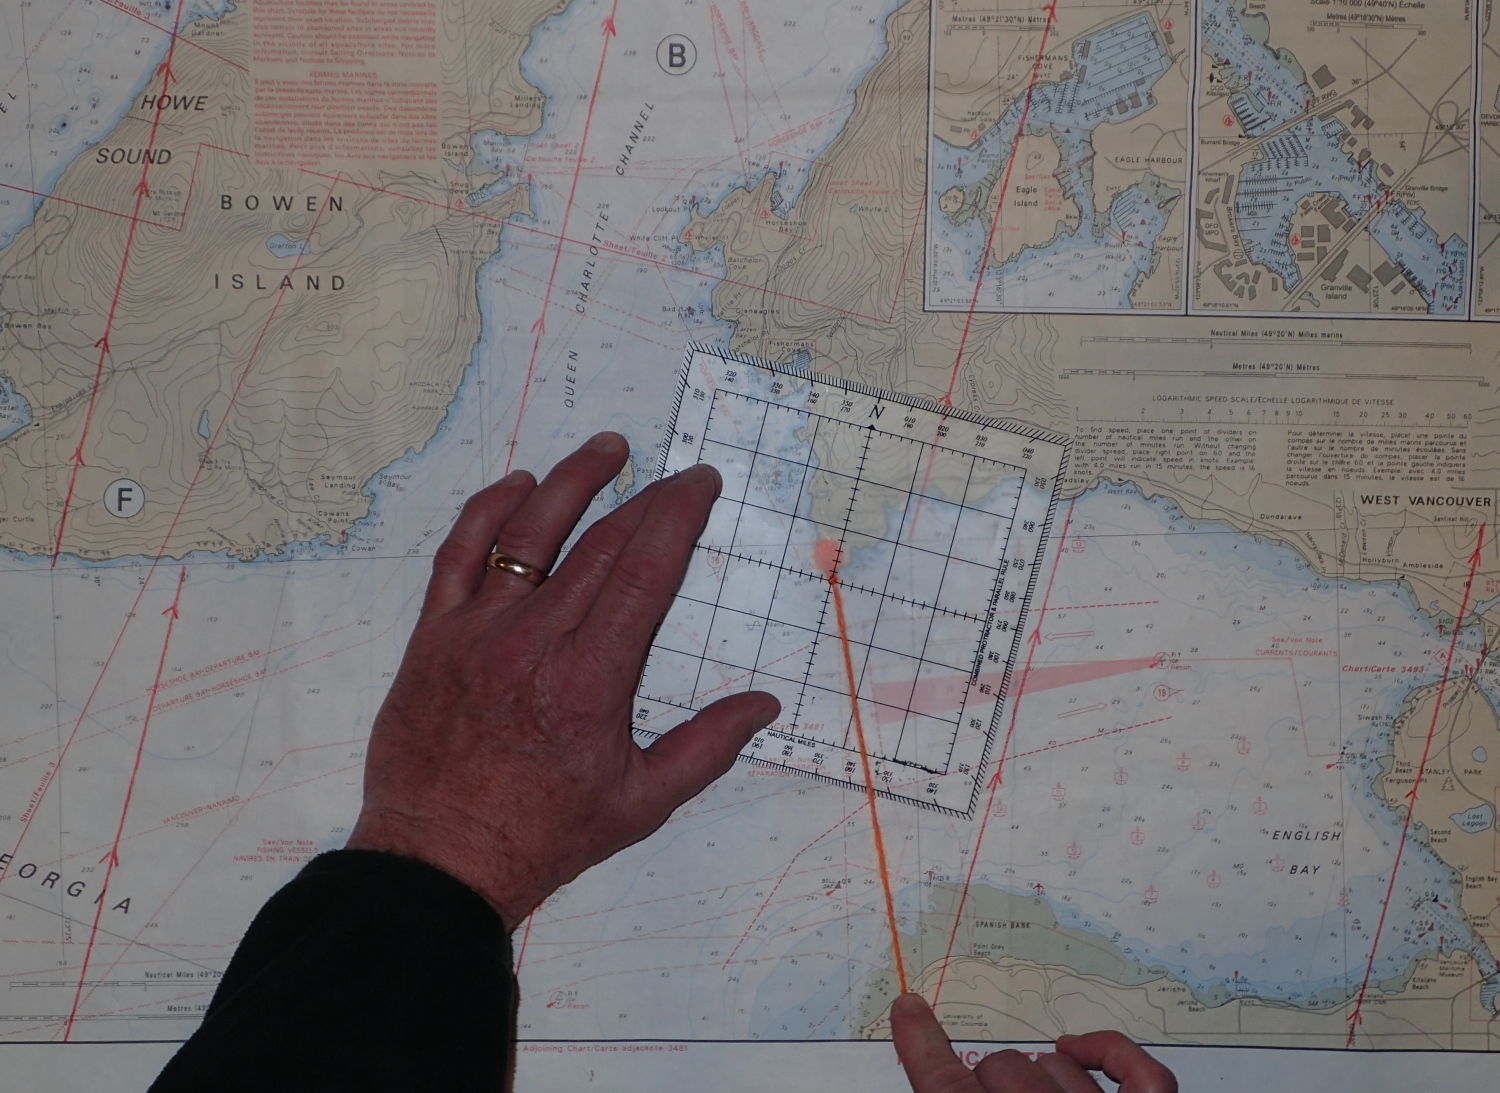
To plot my first Line Of Position, I laid my Davis protractor on the chart with its centre over the Point Atkinson Lighthouse. I pivoted the protractor until its North-South lines lined up with the magnetic North lines I have drawn (in red) on the chart. Then I drew the protractor string across the 335° indicator on the protractor’s outside edge. I lightly penciled in this LOP on the chart.
Plotting my first LOP. With the centre of my Davis protractor over the landmark I shot (the lighthouse), I pivot the protractor until its North-South lines are parallel to the red magnetic North lines on the chart. I then draw the orange protractor string out along the 335° mark on the outside edge of the protractor.
I repeated the process for the second LOP plotted on the southern tip of Bowen Island, this time pulling the string across the 272° on the protractor’s edge. Where the orange protractor string overlaps the pencil line of my first LOP is (or was) my position.*
*Strictly speaking, finding your whereabouts by this process is called resection. But it’s more commonly, if erroneously, referred to as triangulation. So if you talk about “triangulating”, you’re more likely to be understood by your less pedantic fellow paddlers. But if you’re the sort who delights in correcting your campmates with “Well ackchyually, unless it’s from the Champagne district of France…” in your primest Thurston Howell The Third accent, why not baffle them all with resection?
Plotting my second LOP. With the centre point of the protractor on the south shore of Bowen Island, I pivot the protractor until its North-South lines are parallel to the red magnetic North lines on the chart. I then draw the orange protractor string out along the 272° mark on the outside edge of the protractor. Where the string intersects the penciled line from my first LOP was my position when I took both shots with my compass.
With the bow compass swinging in the swell and the limits of reading it, there will be some error in my plotted position. So if I’d needed higher accuracy—if for example I were hoping to avoid some nearby reef lurking in ambush just beneath the surface—I could have shot a third landmark and plotted a third LOP.
As noted, I waited until I was home to plot the LOPs I’d shot on my chart. How would I have done it out on the water? Rather than take my chart out of its waterproof bag, I’d have used the protractor outside the chart bag, and marked the first LOP directly on the chart bag with a chinagraph pencil (which are also excellent for jotting notes directly on the deck of your kayak—such as the changing compass bearings to your landfall, so you can detect the direction you’re being drifted).
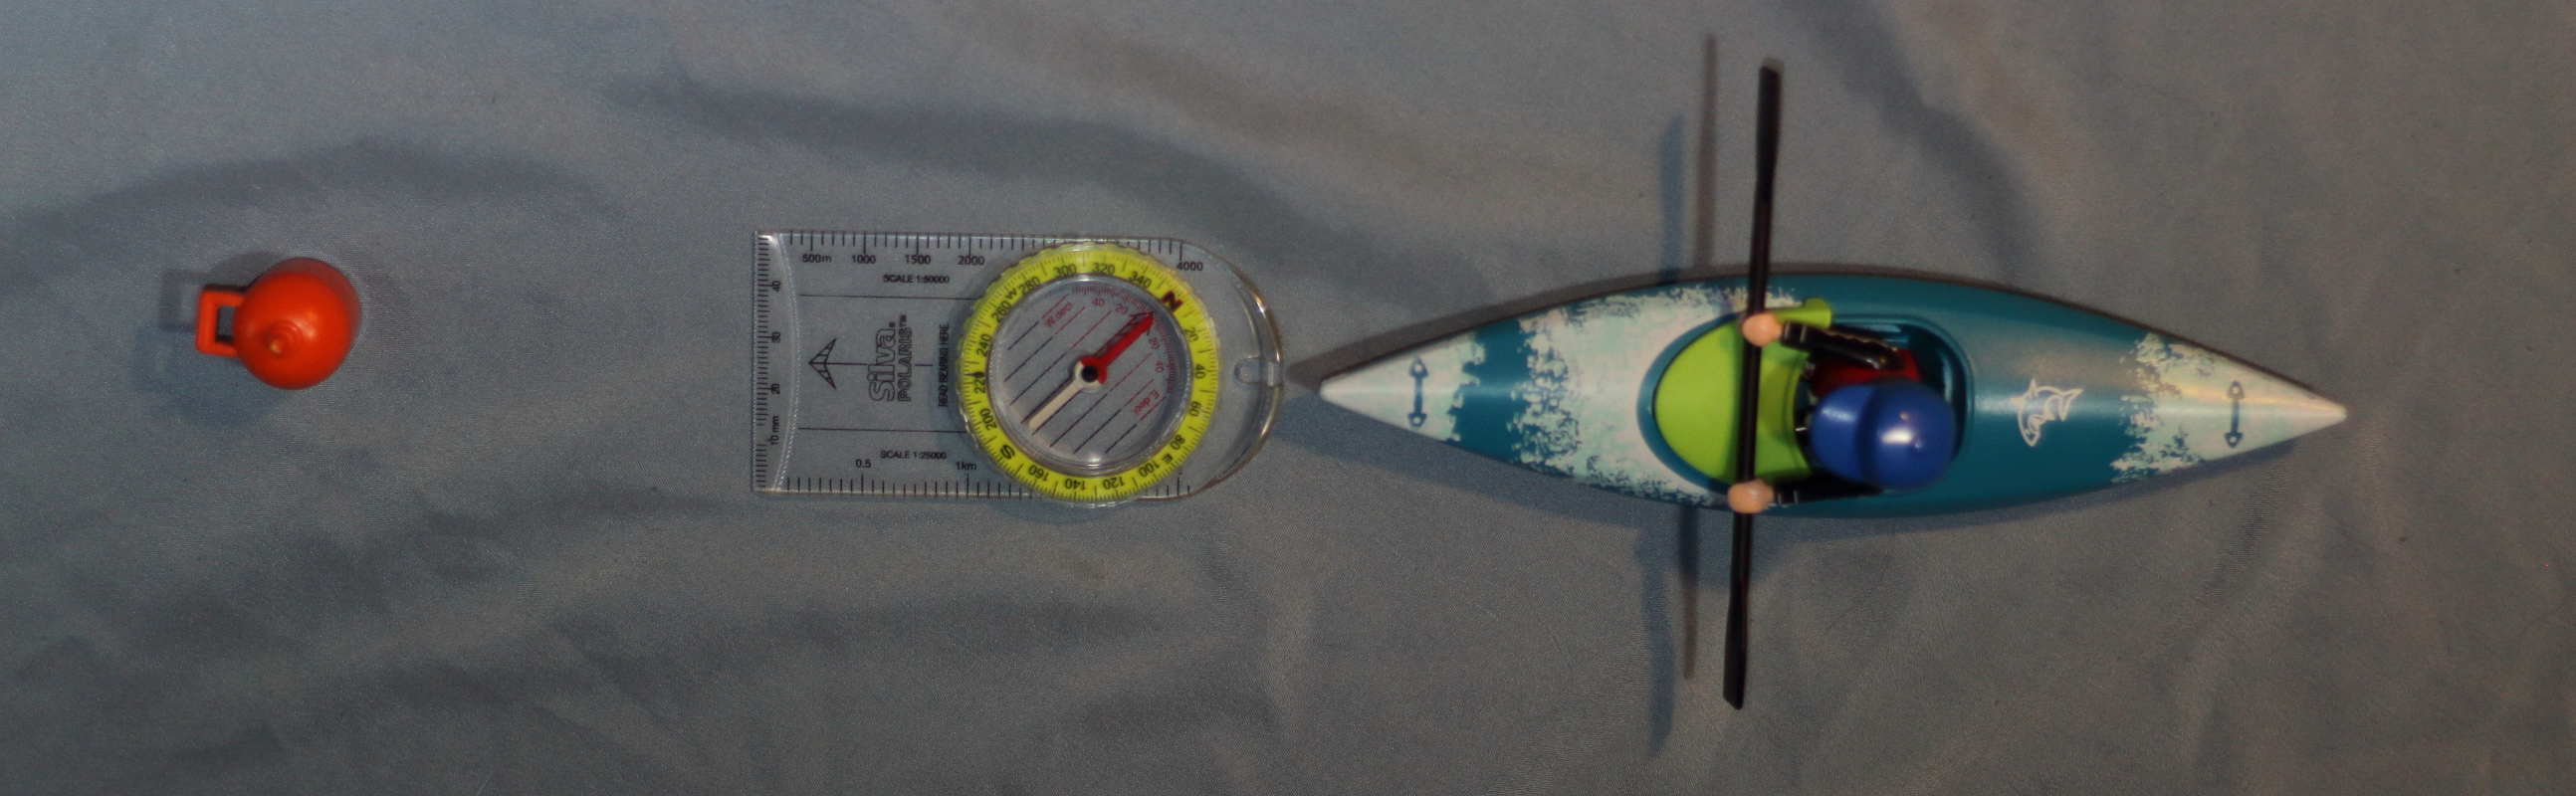
Since I was already on the water, I took advantage of the chance to photograph another example of using two objects as a range for an LOP.
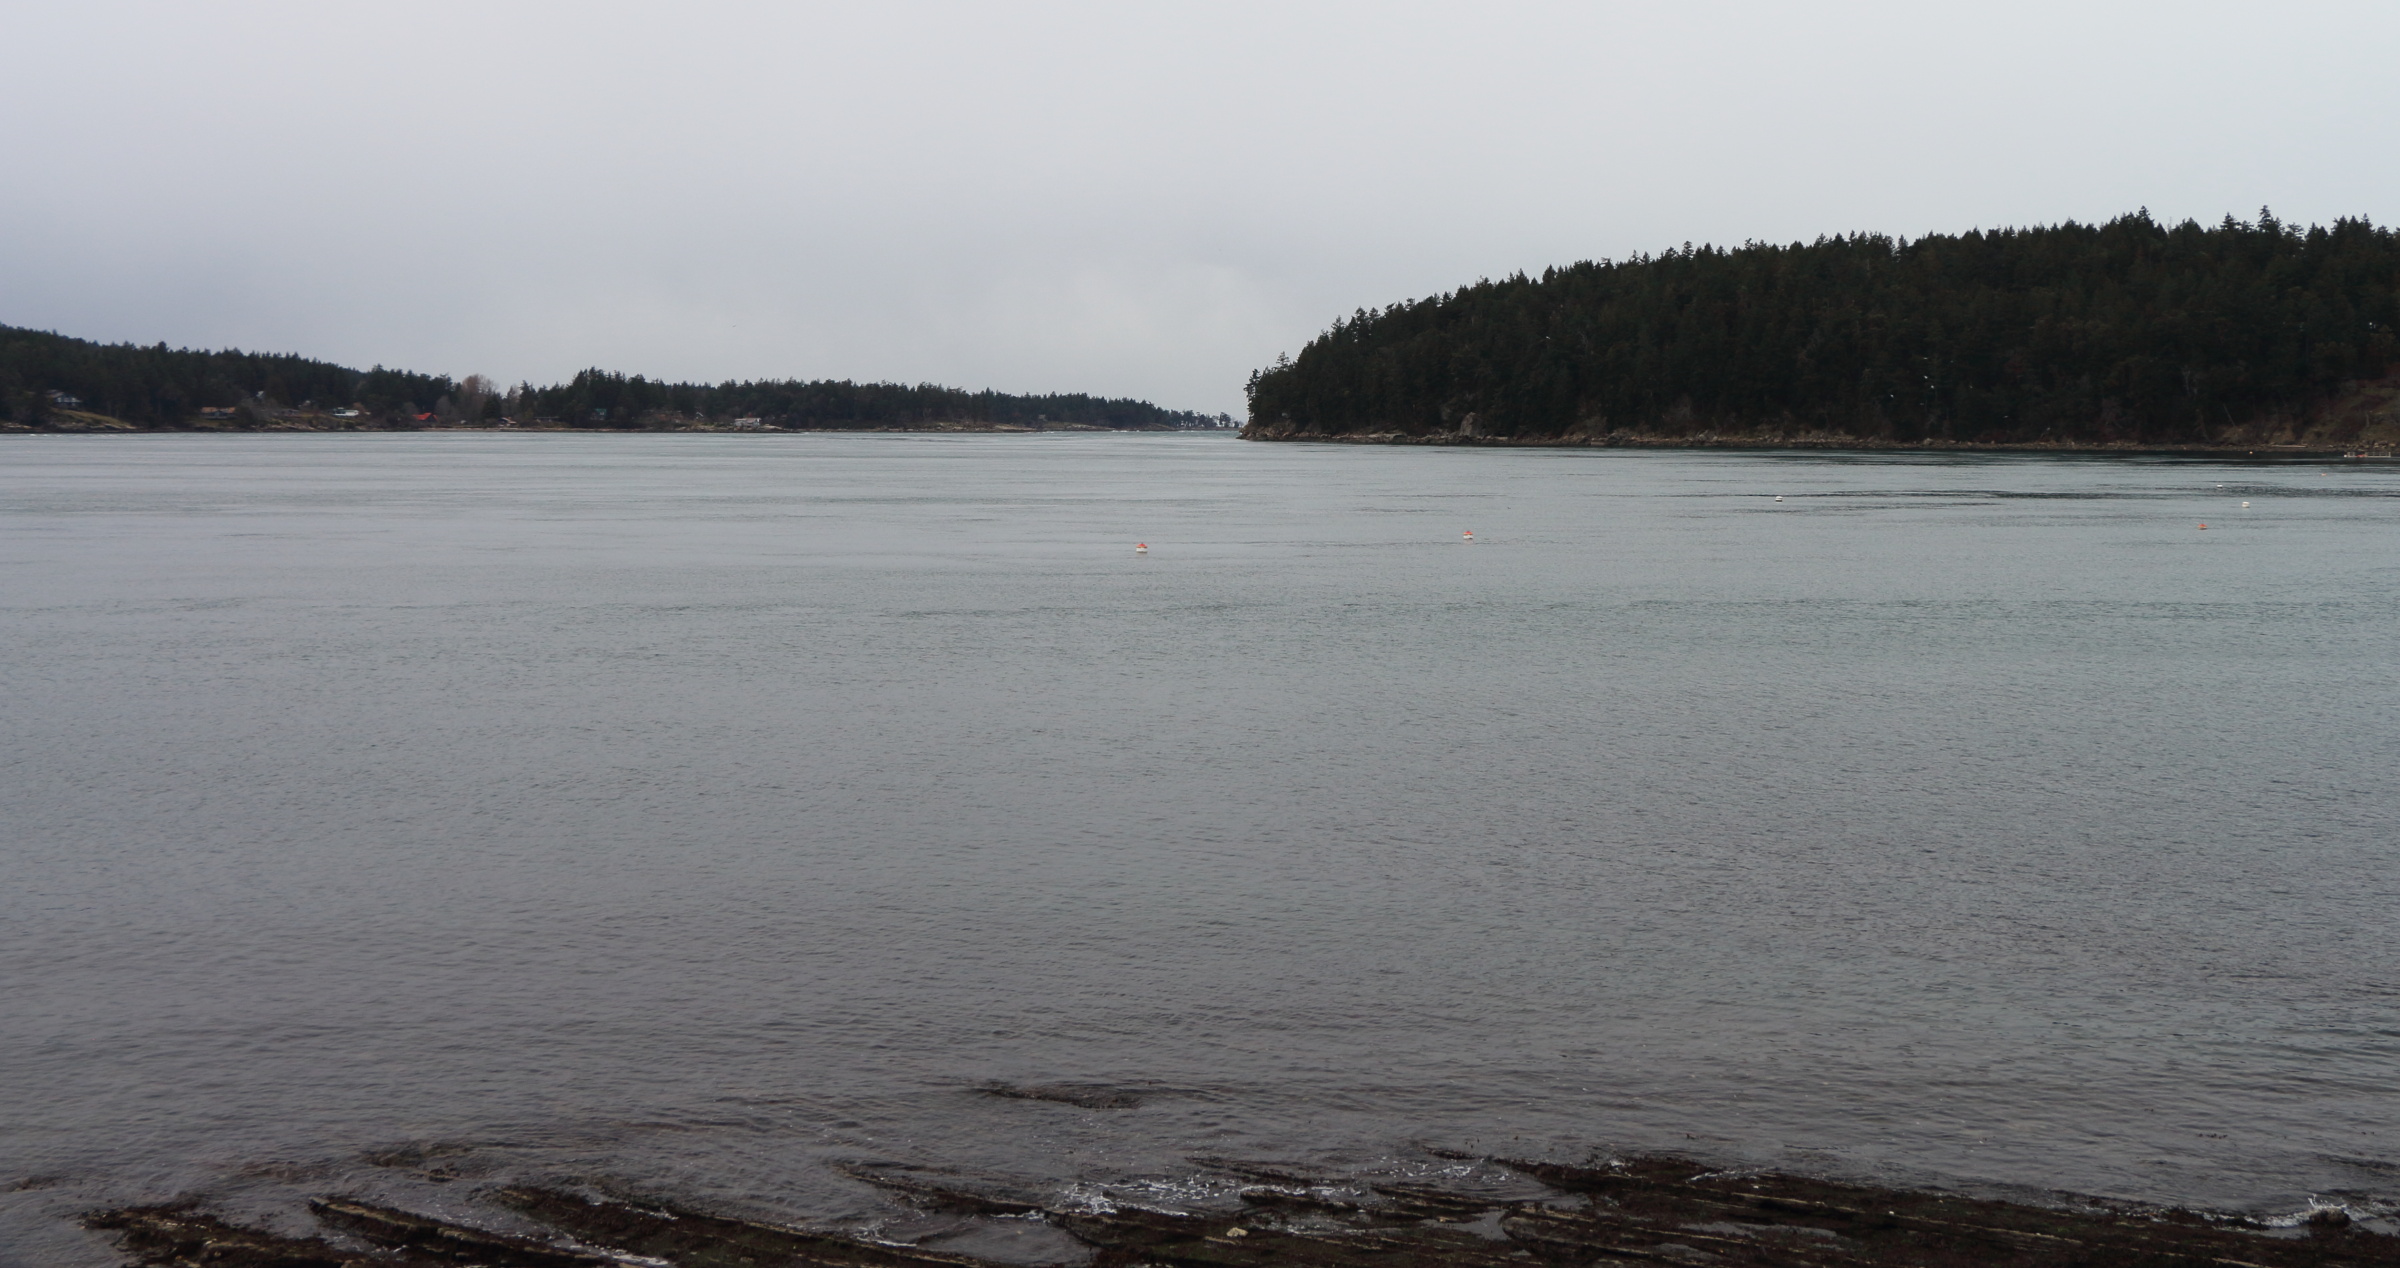
With the nearer landmark object (the red buoy) apparently to the left of the further landmark object (the lighthouse), we know we are slightly to the right (or in this case, to the east) of the LOP they will form when they are aligned.When the two landmarks are in line (the lighthouse is visible through the framework of the buoy), we know we are somewhere along the Line Of Position they form, as shown in bright green on the chart section below.
When the buoy and the lighthouse line up from our point of view, as shown in the photo above, we know we are somewhere along the bright green line, to the south of (below) the buoy.
When the nearer landmark (the buoy) appears to have moved to the right of the further landmark (the lighthouse), we know we are now to the left (or west) of the LOP they form when lined up.
Even when far from shore, you can mix-and-match different kinds of LOPS—compass bearings and/or ranges—to determine your position. So it’s perfectly possible to be “all at sea” in the literal sense without being so in the metaphorical sense of being lost.
The first module of the online sea kayak Trip Planning Course I teach is all about navigating by chart and compass. And one of the questions I inevitably get asked during that lesson is “What about GPSs or smartphone/tablet navigation apps?”
My answer is “I love’m—in their place.” And that place is alongside, not instead of charts, compasses, and hardcopy tide and current tables. Nor am I saying that as some cranky luddite: I was a very early adopter of portable GPSs. I owned one of the first internal battery powered versions in the early 1990s, a Magellan NAV 5000D.
The flower of 1990s technology
This bigger-than-a-brick unit had no built-in scrolling charts: You had to determine the coordinates of your desired destination from a paper chart and manually key them in. Likewise, you needed to transpose the real-time position, shown as raw latitude and longitude numbers on a monochrome LCD, onto your paper chart. That was great for confirming where you were once you’d landed and weren’t moving. But when you were getting surfed along off a lee shore, trying frantically to determine how close you were to sandbars lurking beneath the muddy waters of a shallow Arctic sea? Rather too much latency (as in “The late Philip Torrens was found not far from the reef that had capsized the kayak…”). So by today’s standards, that GPS was risibly clunky (It’s literally a museum piece now.) But by the standards of the time, it was revolutionary. It was an incredible help in finding our way through the often featureless Canadian Arctic.
Navigating like it’s 1993! On the lower left, just above the folded blue chart case, sits a Magellan NAV 5000D, complete with its vertical external antenna in a pivoting white housing of its own. Today, GPSs are much slimmer, lighter and faster. The kayaker-wader on the upper right? Rather the opposite on all counts, really.
Since then I’ve almost always owned and carried a GPS of some type while kayaking anywhere other than in my backyard waters of English Bay in Vancouver, BC. As with all consumer electronics, features have expanded as cost and size shrink. Today’s units can hold integrated scrolling charts that show your position relative to the land and seascape in real time, just as the maps app on your smartphone shows a rolling roadmap when you’re driving.
A screenshot of the “map” page from a last-millennium GPS. No topographical or hydrographical details. A big help, huh?
One of the functions I like best and use most with GPSs is their ability to automagically offset for drift from wind and current in real time and guide you along a fairly straight line to your destination, as opposed to a much longer arc.
There are formulas for predicting the upstream angle you should ferry given a particular current speed, crossing distance and paddling speed—see David Burch’s excellent Fundamentals Of Kayak Navigation. But both current speed and paddling speed can vary over the course of a long crossing. Throw in the wildcard of wind, and holding a straight course gets pretty problematic. Likewise, there are techniques for using ranges and/or changing compass bearings to detect and offset drift. But they rather rely on being able to clearly see specific real world features, which won’t always be possible, especially when your landfall is on or over the horizon. So the longer the crossing, the better I like my GPS.
GPS’s real-time drift detect-and-correct is handy even over shorter distances when I’m kayak sailing. Because kayaks aren’t keel boats, they’re subject to a lot of drift with a sail up, especially when on any point of sail other than running before the wind. With more complicated rigs such as the Falcon Sail I’ve got on my rudder kayak, the crew is often fully occupied trimming the sails properly and has little spare bandwidth for monitoring drift. The GPS helps me point my kayak just far enough off or across the wind to get where I want to go, without stalling by pointing unnecessarily high upwind.
Another very cool feature on many GPSs and apps are the built-in tide and current tables. Often these are not mere numerical columns with times of lowest and highest waters and minimum-maximum current speeds, but also graphs that let you easily determine precise water depths and current speeds at any interim between the highs and lows. That’s really handy for finding tent sites on the beach that won’t feature ensuite swimming pools at midnight, or for deciding just how long after slack water it’s still safe to run Suckemdowne Narrows.
Although it’s great to let the GPS magic box do all that math for you, you should retain a working knowledge of formulas such as the rule of twelfths, the rule of thirds, and the 50/90 rule, plus hard copies of the tide and current tables for the areas you’re paddling. This will both improve your intuitive understanding of what the magic box is telling you, and ensure you’re not left helpless if the magic ever dies due to exhausted batteries or saltwater leakage.
Damn! We missed our slack water window!
I personally have a strong preference for freestanding GPS units over phone or tablet apps. Part of that is probably just intellectual inertia: I’ve been using GPS-specific devices for decades and am very familiar and comfortable with them. But there are practical reasons as well: I prefer actually owning the unit and the data in it to renting an app on a subscription basis. I’ve heard too many horror stories of companies nickel-and-diming their subscribers with fee increases, reducing or bricking functionalities when pushing out upgrades you can’t opt out of, or orphaning apps when they go out of business. I also prefer not having all my electronic eggs in one basket: if I lose my navigation functions for whatever reason, I don’t want to have also lost my phone functions, or vice-versa. Last, but far from least, it’s much easier to operate real buttons than a touchscreen through the plastic window of a waterproof soft case.*
*You absolutely do want cases for your GPSs and phones, notwithstanding any manufacturer’s claims about their integral waterproofness. The one time I insufficiently sealed my soft case, then knocked it into the sea while docking, the supposedly waterproof GPS inside drowned itself in a fit of pique.
Despite my personal preferences for stand-alone GPSs, I can see the case, so to speak, for navigational apps such as Navionics or savvy navvy. They make for one less physical gadget to buy and carry (and for reduced end-of-life e-waste). Plus, to a generation accustomed to downloading apps for everything from ordering dinner to help with stargazing, I’m sure that instantly adding one more functionality to your phone just feels simpler and more intuitive.
That said, I just recently upgraded my ancient (but still operating) Garmin GPSmap 76Cx to Garmin’s GPSmap 276Cx. The new unit is a bit bigger than the old one, which sounds like a retrograde step. But that’s actually a feature, not a bug: the significantly larger screen makes chart details much easier for my elderly eyeballs to read.
Size matters: the relative screen sizes of the Garmin GPSmap 76Cx GPS and the Garmin GPSmap 276Cx. Pocket knife for scale.
Which leads us to an important way GPSs work best alongside hardcopy charts rather than in lieu of them: even the larger screen on my new GPS is only about 2.5” x 4.25”, while the “screen size” of my smallest chart bag is about 9” x 12” (and I have larger ones). Meaning the paper chart covers more area in more detail than the map page of even the largest tablet you’d care to mount on your foredeck. And all at-a-glance, fully sunlight-readable, no zooming or panning-and-scanning required. So when you’ve blundered into the thick of Shipwreck Rocks to find larger-than-forecast swells running, you can use your GPS’s chart page to determine your precise position in relation to immediate local hazards, and the big picture from your paper chart to ensure that the escape route you’re improvising doesn’t turn out to be a literal deadend.
The “map page” of a chart bag. More coverage, more quickly than with any GPS or tablet.
Less urgently, but still usefully: during pre-trip planning at home, you can use the big screen of your computer to scroll electronic charts, and point-and-click waypoints and routes to download to your GPS. But you won’t have that computer with you in camp as you plan the next day’s voyage, often switching things up from your original ideas based on field experience of the area. Rather than just squinting through the letterbox slot of your GPS screen, use your paper charts for big picture planning, then scroll to add any additional required waypoints on the GPS.
Similarly, I prefer to use my GPS in conjunction with, not in replacement for, my old school magnetic compass. Why? Imagine yourself paddling a long crossing directed solely by your GPS. See how pretty is the pixel picture it paints of the virtual world on its chart page! See how it counts down the distance and ETA to your destination in such encouragingly bite-sized increments! See how precisely its compass arrow points the way! See the spiked deadhead log you’ve just punctured the bow of your boat against! Oh, wait – why didn’t you see that? Because your eyes were magpied by those shiny moving screens, distracted in the same way that drivers become intexticated by their phones.
Less lethally, but still tragically, there’s much else you might miss when bowing to the electronic idol on your spraydeck shrine: the bright flash of a passing puffin, or the soft roil of migrating humpbacks, or a baby sea otter bobbing expectantly as it waits for mom to surface with breakfast, or any of the million-and-one things you are presumably out there paddling in order to experience.
How to avoid missing all that? Set your GPS to display the compass bearing to your target waypoint (use the settings menu to ensure it’s displaying a magnetic bearing rather than a true North bearing, and that it is autocorrected for local magnetic variation). Check this reading periodically as you paddle, but actually steer by the bow compass on your kayak. Result: with your head up and your eyes focused for distance, you’ll have much expanded situational awareness (and much reduced susceptibility to seasickness). And if the GPS should decide to shit its pants (sorry about that technical mumbo-jumbo) mid-crossing, reverting to the deck compass for navigation is smooth and panic-free, since you’re already using it to steer to the last known bearing to your waypoint. (Based on how that bearing was changing up to the point of GPS failure, you’ll know whether you were being drifted to the left or to the right, and hence which way to turn to find camp once you hit the shoreline.)
In choppy water, a bow compass is a far less (sea) sickening sight than a GPS on your spraydeck.
BTY, Class D/Class H handheld marine VHF radios have integrated GPSs, and therefore offer navigation pages with a compass pointing to your selected waypoint. But none that I know of offer full marine chart pages (yet – the market is always evolving!) So the navigation experience they offer looks and feels like that of stand-alone GPSs from two decades ago. Also, I like to have my VHF in a holster on my PFD, rather than on the deck, in case of separation from my kayak (When it comes to emergency equipment: If you don’t have it on you—you don’t have it!) So for those reasons, I’d never rely on my radio as my primary electronic navigation tool. That said, if I found myself in swirling fog and currents, uncertain of my position and with my primary GPS inoperable, I would absolutely use the VHF GPS for my Hail Mary play.
Aside from the sheer satisfaction of using the traditional skills and technology of charts and compass, and the sense of connection that gives me with all the generations of seafarers who have come before me, there is that practical benefit of redundancy in the event of equipment failure. (I felt a smug sense of vindication when I learned that the US Navy, after having skipped celestial navigation training for an entire generation of officers on the grounds that GPS had rendered it obsolete, brought back sextant schooling several years ago.)
So think of compasses and charts and hardcopy tide and current tables not as low tech but as highly robust tech. If none of them had previously existed and someone introduced them today as a navigation suite that doesn’t depend on satellites or subscriptions, never needs batteries, is pretty much impervious to salt water damage, and is immune to spoofing*, that would sound pretty damn amazing. As it is!
*With the exception of the “self spoofing” you can accomplish by packing your steel hatchet in the bow compartment just under your deck compass. Or by letting the magnetic clasps on your waterproof phone case swing too close to the hiker’s compass in your chart bag. You deviants!
In a previous post, we talked about Lines Of Position and about two kinds of LOPs: the shoreline, and compass bearings taken from recognizable landmarks.
But sometimes we just don’t want to break our paddling flow to stop and take compass bearings. And sometimes exuberant waves make shooting and transferring bearings onto a chart that’s bouncing off the trampoline of a sprayskirt deck rather like working on a crossword while riding a Tilt-A-Whirl. At such times, it would be great to have “self-shooting” LOPs. Happily, these exist: they’re called ranges*. They come in two flavours: artificial ranges, which kayakers generally avoid, and natural ranges, which we embrace like the tree-huggers we are.
* Or “transits” if you’re British. They do have a strange habit of coming up with odd new words for things when there are already perfect serviceable ones in English. See truck/lorry, glasses/spectacles, trash can/dustbin, etc.
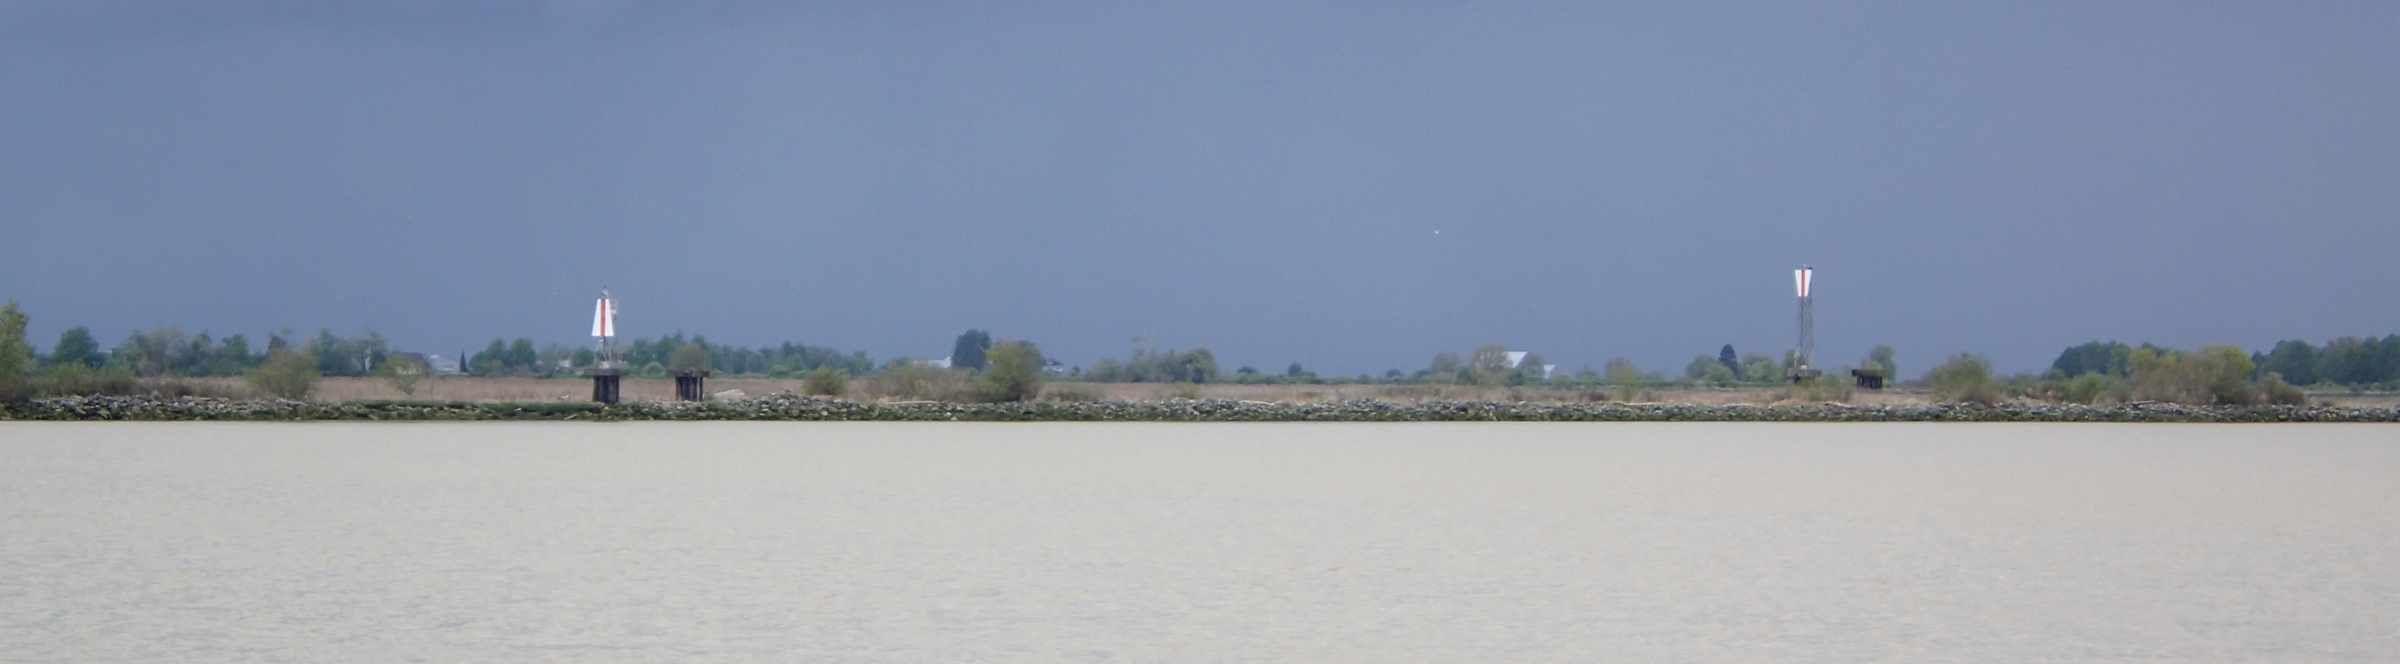
Artificial ranges are often erected along narrow channels and tricky harbour approaches for the benefit of bigger boats. They’re typically a pair of brightly-coloured trapezoids mounted on frame towers a few hundred metres apart. When the captain of a ship sees them lined up, one directly above the other, it tells them they’re in deep water, in the centre of the marine traffic lane, right where they want to be. When the captain of a kayak sees the same thing, it tells them they’re in deep doo-doo, in the centre of the marine traffic lane, right where they don’t want to be. At best a kayaker may acquire an expensive ticket for interfering with bigger boats; at worst they might be pureed in the prop of an overtaking freighter. So take advantage of your kayak’s much shallower draft and hug the sides of any such vessel traffic lanes you must follow. (But also remember that the wake from big boats will get steeper and more spilly in the shallows.)
A pair of artificial ranges. If you were piloting a ship downriver, you’d want to move far to the left to get the ranges to line up one over the other and put your craft in the deep water channel until you hit the 12A marker shown on the chart section below.The same ranges, both circled in blue, as they appear on a nautical chart. The bright green circle shows approximately where the photo above was taken.
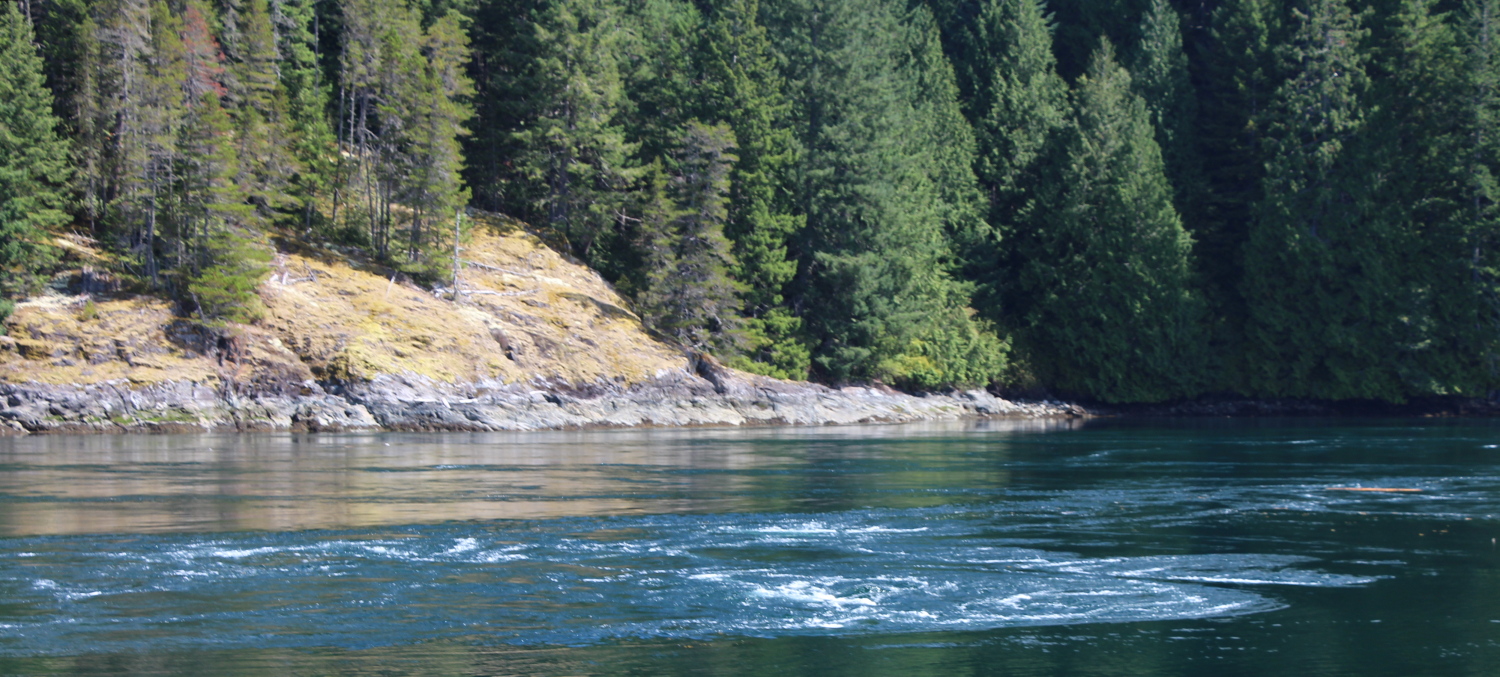
Natural ranges occur wherever two distinct landmarks line up from the paddler’s point of view. They’re the same sort of landmarks we’d be looking for when taking a compass bearing: the end of an island, a navigation buoy or marker, or the tip of a point.
Looking north from the shoreline of Miners Bay on Mayne Island. Laura Point, in the middleground on the right, is just overlapping with the eastern tip of Gossip Island, visible in the far background, beyond Rip Point and Burrill Point on the left.The natural ranges from the photo above as they line up on a chart. Where the orange line meets the shoreline of Miners Bay is your location. (The large public dock you’d be floating beside would also be a good clue to your location, but you can’t always count on having such infrastructural validation, especially when you’re paddling in remote areas.)
Update March 2024: for another example of a range as an LOP, see the second half of this posting.
You can mix-and-match the intersection points of all types of LOPs to find your position. If all your LOPs are shorelines and natural ranges, you can usually count on them to be pretty accurate (islands and buoys generally don’t move around much). But if one of your LOPs is a compass bearing, it’s not a bad idea to take a second bearing off another object, just to offset errors in taking the first shot and transferring it to the chart.
The next best thing to a natural range as an LOP is a pre-plotted compass bearing. Especially when searching along a shoreline for a not-obvious-from-seaward campsite, a pre-plotted LOP can save a lot of anxious vacillation between “We should spot camp any minute now” and “We’ve overshot it and need to turn around.”
To pre-plot a compass bearing LOP, identify a landmark on the chart you’re confident will be visible as you’re approaching the target campsite in real life. Next, use a ruler or parallel rules to draw a straight line from the campsite to the landmark. Then, using either a hiker’s compass or a string-equipped Davis protractor, determine the magnetic bearing from the campsite to the landmark. (If you do all this at home or ashore in camp, it will be much easier to plot accurate bearings and draw straight lines.)
Pay no attention to the waterfall! We’re navigating by chart and compass, dammit!
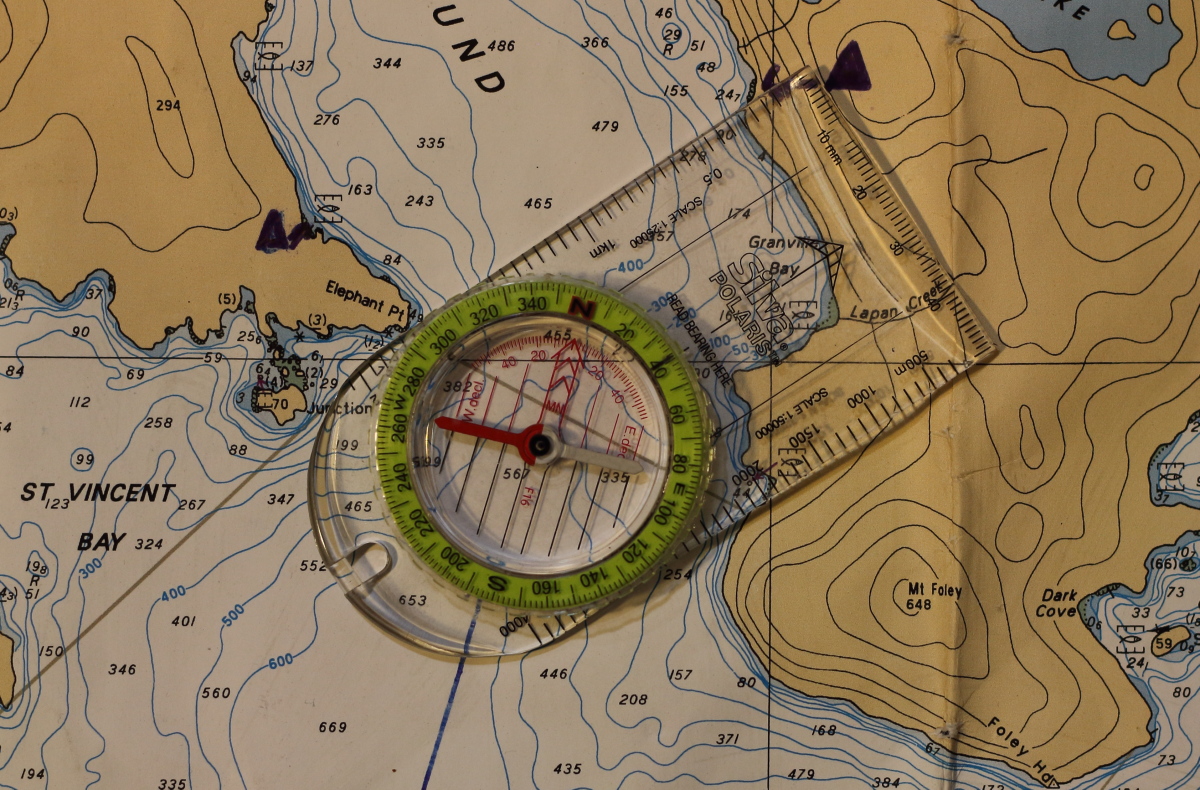
For a worked example, let’s go back to the chart we used in this post. But now let’s pretend that instead of making a crossing from Elephant Point to the campsite, we’re paddling north along the shoreline of Granville Bay looking for it. (For purposes of this exercise, we’re going to ignore the fact that in real life, just north of this campsite, there’s a fourteen-hundred foot waterfall thundering down the cliffs as a subtle visual and audio clue to your whereabouts!)
How we determined the bearing from Elephant Point to camp using a hiker’s compass. The “Read Bearing Here” indicator on the compass shows 39°, which we rounded to 40° for practical purposes.
To determine the magnetic bearing from the campsite to Elephant Point with a hiker’s compass on the chart, we could just reverse the procedure shown in the photo above. We’d lay one edge of the compass baseplate running between camp and Elephant Point as before, but this time with the Direction Of Travel arrow pointing the opposite way. Next, we’d turn the compass bezel to make its meridian lines parallel to the blue magnetic North lines on the chart, then note the degrees shown at the Read Bearing Here indicator. But we’ve already done all the same sort of work to determine the bearing from Elephant Point to the campsite, as shown in the photo. That bearing was 40°.
You’ve probably heard the slang, “Doing a one eighty!” to describe turning right around to head straight back to where you came from? It’s a handy way to remember how to work out the reverse (technically called the reciprocal) bearing from B→A when you already know the bearing A→B. In this case, we know the bearing from Elephant Point to the campsite is 40°. So we add 180° (“one eighty”) to 40° and get 220° – the reciprocal bearing from the campsite to Elephant Point.*
*When our original bearing is 180°or less, we add 180 to determine the reciprocal. If the original bearing is greater than 180°, we subtract 180 to get the reciprocal. So if the original bearing had been 270°, the reciprocal would have been 90°. Why this way rather than just always adding or always subtracting? Because, for tediously complicated historical reasons, compasses use 360°circles. So unless you’re Captain Jack Sparrow, your compass won’t show a course higher than 360° or in negative degrees.
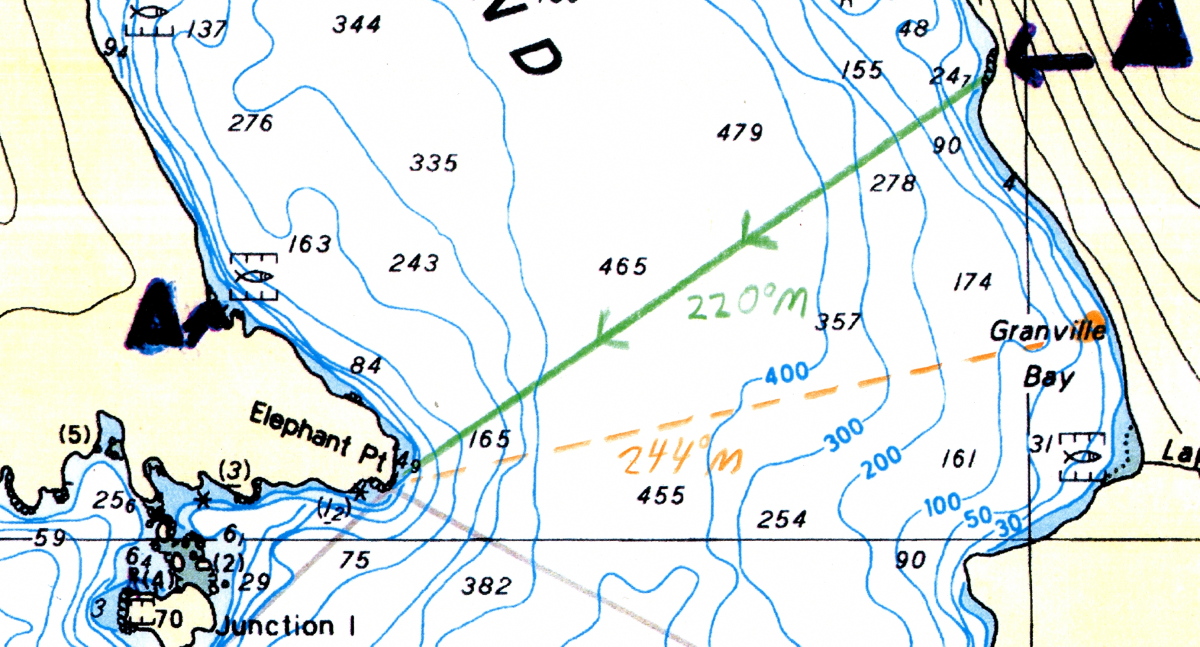
How we determine a bearing from Elephant Point to camp using a modified Davis Protractor. Happily, the indicated bearing is 40°, same as for the compass method above. Alert readers will note that the reciprocal bearing, 220°, is also shown on the edge of the protractor, saving us from having to do the addition or subtraction described in the paragraphs above to get the bearing from camp to Elephant Point.A pre-plotted bearing line in green. The letter “M” after the noted 220° reminds us that this bearing is relative to magnetic North rather than true North. The arrows on the line indicate that the bearing shown runs from camp to Elephant Point.
So now we note the 220° bearing from the campsite to Elephant Point on the green line drawn between the two. As we make our way north up the shoreline of Granville Bay, we periodically take a shot of Elephant Point with our hiker’s compass or our deck compass. If the bearing we get is greater than 220° (I.E. further south), we know we’re not quite there yet; if it’s less than 220° (I.E. further north), we know we’ve overshot.
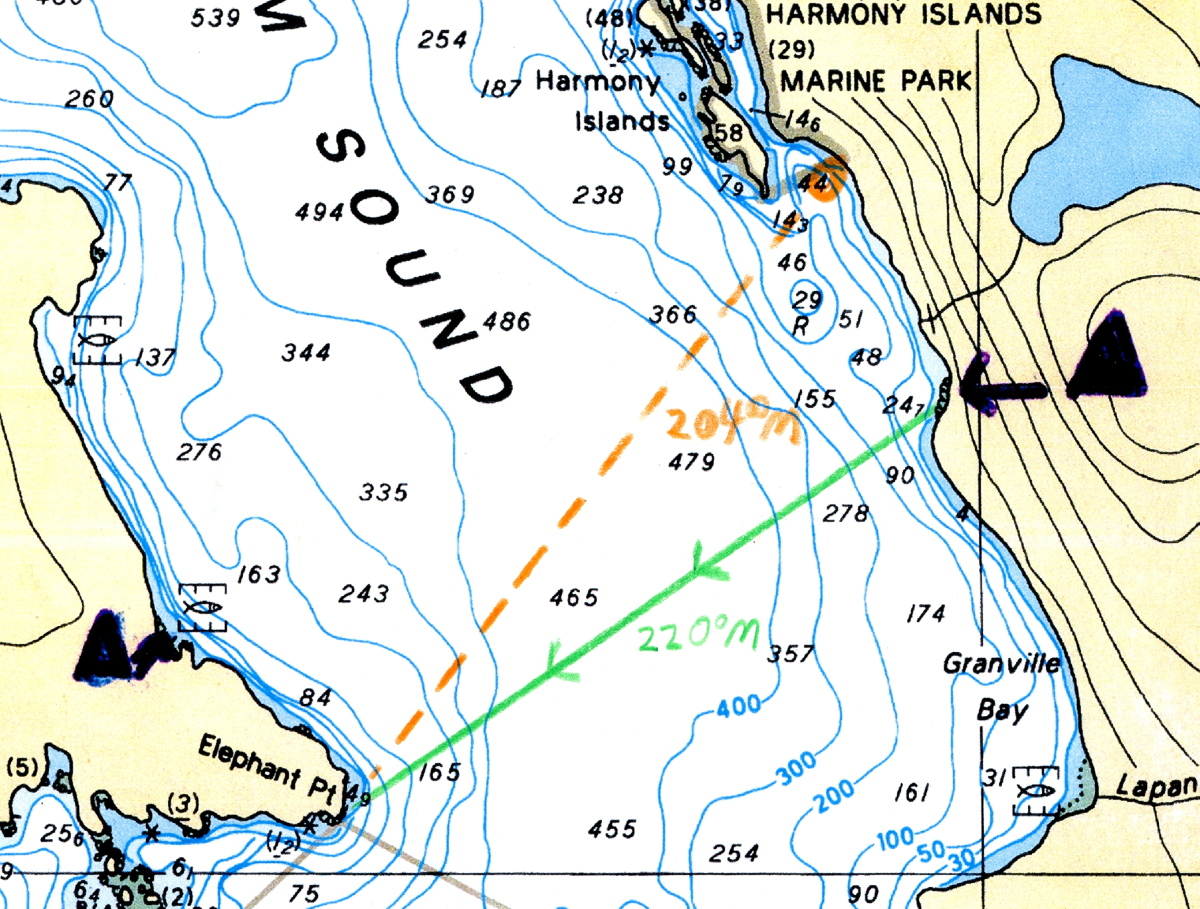
Imagine we are paddling north along the shore of Granville Bay and are at the orange circle over the end of the word “Granville”. If we were to take a bearing to Elephant Point from here, using either our hiker’s compass or deck compass, we’d get a reading of about 244°. That’s south of the 220° pre-plotted bearing to camp, so we’d know we weren’t there yet. If we found ourselves at the location of the orange circle shown here, a compass shot to Elephant Point would give us a bearing of about 204°. That’s north of the 220° pre-plotted LOP to camp, so we’d know we’d gone too far.
It’s good practice to er, practice with LOPs of all kinds even in waters you know like the back of your hand. In fact, especially in waters you know like the back of your hand. That way you’ll quickly recognize any errors you’ve made. Then, hopefully having made all your mistakes in low-consequence situations, you’ll be more confident and competent when applying those skills “for reals” in unfamiliar environments.
In an earlier post, we discussed how to use a chart and compass to find a compass bearing we could follow to a desired destination. But all those techniques for heading somewhere new require us to know where we are now. As any kayaker who’s ever done a longer crossing or paddled along a featureless shoreline can confirm, it’s easy to lose track of your precise location. How do we find it again?
First, a quick detour into a concept called a Line Of Position (LOP). You’ve almost certainly used LOPs before, even if you didn’t call them LOPs. If you were wandering around a city (for example, Vancouver, British Columbia) with a paper street map, you might have known you were somewhere on Granville Street, but not sure where along Granville. So you walked down to the next corner and checked the signs for the cross street. Finding it was Broadway, you now knew your exact location: the intersection of Granville and Broadway. Each of those streets served as one LOP for you. Where the two LOPs intersected was your location.
Granville Street is one Line Of Position. Broadway is a second Line Of Position. Where they intersect is your location. See, you’re already a navigator!
To determine our location when sea kayaking, we do exactly the same thing: we find the intersection of two or more LOPs. The only difference is that we use lines other than streets as our LOPs.
Even for novice kayak navigators, there’s one Line Of Position that’s so obvious you’ve probably used it without even thinking about it: the shoreline. (Yes, most shorelines are curvy and crinkly rather than straight. But there’s no requirement that every Line Of Position be a straight line. In my hometown of Vancouver for example, Kingsway Road has lots of jinks and bends, but I can still use it to clearly define a position such as “the intersection of Kingsway and Broadway.”)
Bendy LOPs? No problem: where they intersect is still your position.
So, if we only ever intend to navigate along shorelines, why would we ever need a second LOP?
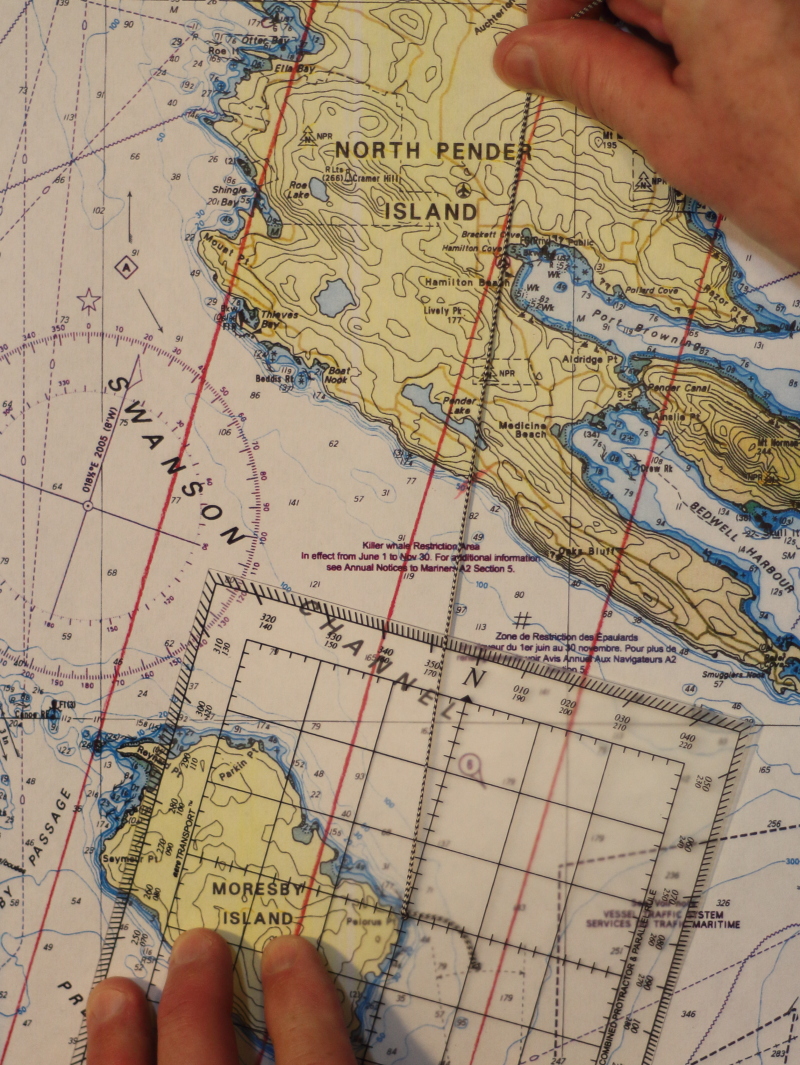
Imagine you and I and several friends are kayaking close alongside the southwest shore of North Pender Island, admiring the undersea flora on the rock wall and petting the passing Orca. Distracted by all this merriment, we’ve lost track of how much time we’ve spent paddling vs drifting. Plus, the tricky currents on this coast have sped us up or slowed us down unpredictably. So now all we’re sure of is that we’re somewhere between Boat Nook and Smuggler’s Nook. We need a second LOP to show us exactly where between those points.
A section from CHS Chart #3441. Look for Canoe Rock (below the purple compass rose) and Pelorus Pt (on the right/East side of Moresby Island). The red lines I’ve drawn in point to magnetic North, 16° East of truth North. (Why 16° East? The purple compass rose shows true North, magnetic North as of 2005, and a predicted change in the magnetic variation of 8’ Westward annually. So in in the 18 years since 2005, the variation is predicted to have reduced by 2° 24’ (18 years x 8’ = 144’ or 2° 24’). The variation in 2005 was 18 1/2° or 18° 30’. Subtracting 2° 24’ from that gives us 16° 6’ East. This matches pretty closely with the 15° 46’ East predicted for this area by the online declination calculator. We can round either figure to 16° East for practical purposes.)
To lay out a second LOP, we need to take a compass sighting (AKA a bearing) from any clearly identifiable location shown on the chart and visible from where we are in the real world. A lighthouse, the tip of a cape, one side of a known island, or a distinctive mountain peak would all be excellent options.
Looking out to sea from Pender Island, we find a highly distinctive landmark to take a bearing from: the red-and-white marker on Canoe Rock. Even better, it’s at roughly a right angle to the shoreline. (It’s a good habit to pick your landmarks so that your LOPs meet at as near to right angles as possible; this creates a much clearer intersection point than sharp acute angles or almost parallel obtuse angles.)
Taking a bearing from a real-world object (in this case, the orange thingie representing the marker on Canoe Rock) using a hiker’s/orienteering compass. Step 1. Holding the compass as level as possible, aim the Direction Of Travel arrow towards the landmark. Pro tip: this is much easier and more accurate if your body is facing the landmark. Which means your boat should also be pointing in at least the general direction of the landmark. Notice that at this time, the compass bezel dial is in a random direction relative to the magnetic compass needle, with the N (for North) on the bezel not aligned with the red needle tip. Taking a bearing from a real-world object using a hiker’s/orienteering compass, Step 2. While keeping the Direction Of Travel arrow aimed at the landmark, twist the bezel dial until the meridian lines in the bottom have put “Fred in the shed” — that is, the red box on the bottom of the bezel is enclosing the red half of the magnetic needle, and the N on the bezel is directly in front of the red needle tip. Read off the degrees at the Read Bearing Here indicator. In this case, the bearing to Canoe Rock is 224°. (BTY, if this whole process feels exactly the same as taking a bearing to a visible landmark you want to paddle to following a compass course, that’s because…it is!)
Great. We have our bearing off Canoe Rock. So now what? So now, we’re going to transfer that bearing into an LOP on our chart.
Using a hiker’s compass to transfer a bearing onto a chart as an LOP. We keep the bezel dialed to 224°, from when we “shot” our bearing to Canoe Rock. Keeping the meridian lines on the bottom of the compass bezel as parallel as possible to the red magnetic North lines on the chart, we put one edge of the compass baseplate on the Canoe Rock landmark on the chart. That baseplate edge is now a Line Of Position. Where that LOP intersects the shoreline is our location. In this case, the baseplate doesn’t quite reach to Pender Island, so we extend the LOP by eye and pencil it in. (Notice that we don’t care about where the compass needle is pointing now: we’re just using the compass bezel and baseplate as a protractor.)
Woot! We are unlost! We are right where the shoreline (the first LOP) and the bearing from Canoe Rock (the second LOP) meet. High fives everyone!
BUT…
We took that compass bearing with a hand-held land compass from the cockpit of a kayak rocking in the waves (landing to take the bearing wasn’t an option on the cliffy shores). And we extended that LOP by eye from where we ran out of compass baseplate. So there have been lots of opportunities for errors to creep in. How can we cross-check our apparent position? By determining a third LOP.
Happily, our pod of paddlers includes the excellently-equipped Greta Geerweenie, so we can not only shoot an entirely separate landmark, we can do so using a more accurate instrument. Because Greta’s kayak boasts a deck compass, aligned with the keel line of her kayak. So to take a bearing, she simply aims the bow of her boat toward her chosen landmark (Pelorus Point on the east side of Moresby Island), and reads the bearing in degrees at the lubber line.
Taking a bearing with a deck-mounted marine compass. With the kayak pointing towards the real-world landmark (the orange thingie now representing Pelorus Point), we read the bearing directly from the black “lubber line.” In this case, it’s 172°. (No bezel twisting required. Because instead of the needle on a hiking/orienteering compass, a marine compass has a floating, degree-marked dial that rotates to line up with local magnetic North.)
But Greta’s opportunities to flaunt her superior gear don’t end with the deck compass. Now it’s time to transfer the bearing she shot onto the chart as that third LOP. Rather than roughing it with the hiker’s compass, she whips out her modified Davis Protractor, complete with String™ that extends much further than the baseplate on a hiker’s compass.
Using a string-equipped Davis Protractor to transfer a bearing onto a chart as an LOP. Position the protractor’s centre point over the landmark we took the bearing on (Pelorus Point). Pivot the protractor until its North-South grid lines are parallel to the red magnetic North lines on the chart. Pull the string taut across the degree reading we got with the compass (172°) on the outside edge of the protractor. Where the string intersects the shoreline is our location. Reassuringly, it’s pretty much the same place as the LOP from the first landmark showed us. (And remember how we said we don’t care about where the compass needle is pointing for this step? The Davis Protractor doesn’t even have a compass needle to distract us!)
We won’t always be paddling with a Greta Geerweenie. But we still can (and should) cross-check our plotted position wherever possible by shooting at least two landmarks as bearings and bringing them down onto our chart as LOPs, even if we’re only using a humble hiker’s compass for everything. It’s also true that in the real world, our multiple LOPs won’t usually intersect with the suspiciously perfect agreement they have in this story: typically they’ll form a triangle. You’ll know you’re somewhere inside that triangle, and as long as it’s small enough, it will be good enough for navigation purposes.
A PLOT TWIST!
Clever readers (which is all of you, of course) will have realized something: once we’ve intersected two or more LOPs based on compass bearings, we don’t need the shoreline LOP anymore to know where we are. That’s exactly how bigger, deeper boats, who need to stay further from the shore than kayaks, do it. And exactly how you can do it as you graduate from simple shoreline paddling to longer crossings. There are even other compass-free LOPs you can use when away from the shore. But we’ll save those for another post.
If you’ve done any map/chart and compass navigation at all, you’ve wrestled with the inconvenient truth: with some very limited local exceptions, in most parts of the world, the needle on your compass does not point to the true North pole (the Northern tip of the axis around which the Earth revolves, also known as the geographic North pole); instead, that needle usually points to the magnetic North pole. Sort of. Because what that needle is actually doing is aligning itself with the local magnetic field of the Earth. And those local fields are heavily influenced by currents and counter-currents in the sea of molten iron that swirls far below the Earth’s outer crust.