If you’ve done any map/chart and compass navigation at all, you’ve wrestled with the inconvenient truth: with some very limited local exceptions, in most parts of the world, the needle on your compass does not point to the true North pole (the Northern tip of the axis around which the Earth revolves, also known as the geographic North pole); instead, that needle usually points to the magnetic North pole. Sort of. Because what that needle is actually doing is aligning itself with the local magnetic field of the Earth. And those local fields are heavily influenced by currents and counter-currents in the sea of molten iron that swirls far below the Earth’s outer crust.

What this means is that, very vexingly, the angular difference between true North and magnetic North is not always the same. Instead, it varies in degree and even direction (I.E. whether the compass needle points west or east of true North), depending on where you are on the planet. Worse yet, the magnetic North pole inconsiderately wanders around over time, so the difference between true North and magnetic North depends not only on where you are, but also when you are. (The magnetic North and South poles are so peripatetic that they actually trade places every several hundred thousand years or so. While these fluctuations are a pain for navigators, they’re a boon to geologists, who use palaeomagnetism to learn all kinds of cool things about rocks.)
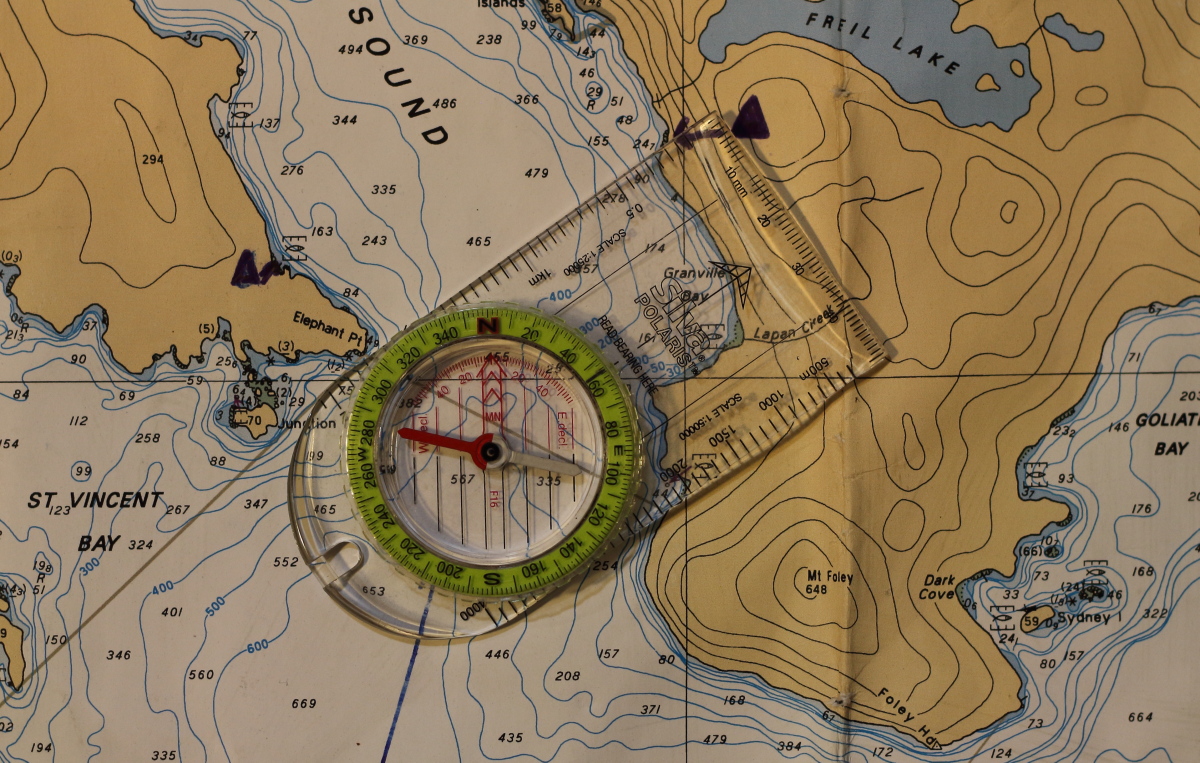
So, how do we determine the local angular difference (or variation1) between true and magnetic North? On marine charts, variation is shown on the inner compass rose, as in the image below:
1If you’re navigating on land, this difference is called declination. If you’re navigating at sea, the same thing is called variation. This is part of a long nautical tradition of inventing new words for things when perfectly serviceable terms already exist in English, so that sailors can sneer at landlubbers for their ignorance. See also: map/chart, wall/bulkhead, floor/deck, rope/sheet, left/port, right/starboard and others too numerous to mention.

The magnetic North arrow shows not only the variation for a specific year, but the rate of change each year. So you could simply do your own math to determine it for the current year. But recently it’s been discovered that the rates of change scientists had previously predicted are themselves now a-changing. So to get the best possible current estimate, visit the online declination calculator, pan and zoom ’til you can drop the mouse pointer in the area your chart covers, click there et voilà: the current declination is automagically calculated for you!
Woot! We’ve established the corrected variation for our time and place. Now what? How do we work back and forth between true and magnetic North? Classically, we used some cunning rhymes or other mnemonics to guide us on whether to add or subtract. The best ones I know of for my home waters on Canada’s west coast are:
GUMA Ground Unto Map, Add variation
MUGS Map Unto Ground, Subtract variation
That first initialism, GUMA, tells us that if we’re going from ground (a magnetic bearing taken with our compass from an object in the real world) to the chart, we add variation to find the true North bearing. And vicey-versa with MUGS: if we’ve determined a bearing relative to true North on our chart, we subtract variation to find the magnetic bearing that will point to that location in the real world. (East of the agonic line, which runs through Ontario, the situation is reversed. You’re on your own for cunning rhymes there!)
There’s no question this approach works, to varying degrees. It’s been in use for centuries, and the rate of mariners going MIA has apparently been low enough not to cause widespread revolt. But personally, I’m pretty visual: being able to glance at my chart and just deal with one North and the angular difference between that and the bearing I’m paddling or the sight I took is more intuitive and easier. I can do all that addition and subtraction, but I have to stop and think carefully about it. The potential for error, especially if a paddler is distracted by rough seas, fatigue, cold, stress and/or fear, seems pretty high. And even when I get it right, it’s a time-consuming extra step. Surely there must be simpler ways?
Folks with an orienteering2 background are, at least metaphorically, waving their hands at this point, eager to extoll the virtues of their cunning compass with its built-in declination adjustment.3 And yeah, those are pretty cool for land navigation. I have one myself. Set it and forget it (at least until you move to an area with different declination). Do everything in true North degrees and minimize the muddle-prone math.
2Land navigators such as orienteers not only have to deal with the difference between true and magnetic North, they also have to wrestle with a third concept called Grid North. Don’t ask. Just be thankful you’re a kayaker rather than a hiker.
3 My family’s lore includes the cautionary tale of my several-times great Uncle Tates who was perhaps the first to design a compass with declination adjustment, back during the era of brass instruments and suchlike steampunk. Unfortunately, an oversight in the manufacturing process caused the worm screws to be installed backwards, so that when users thought they were offsetting the variation error, they were in fact doubling it. So the Tates Compass Manufacturing Company was in business only long enough to leave us with the timeless aphorism: “He who has a Tates is lost.”
A declination-corrected compass is great if you’re only using one compass to navigate with. But for many sea kayakers a wild card comes into play – specifically, the card in a deck compass.

So, why use a deck compass? For one thing, it’s much easier to keep on course with a deck compass than a hiker’s compass. Instead of bobbing your head like a demented pigeon as you go from scanning the horizon to squinting at the chart case and back again, you can hold your chin up high, maintain good situational awareness and always have the compass in your lower field of view. Nor do you have to continually switch focus between infinity and a couple of feet (the more ancient your eyes are, the more you’ll appreciate this benefit.) If you’re taking a sight to determine your position, you don’t have to drop your paddle and mess about twisting a bezel; provided your deck compass is accurately aligned with the keel line of your kayak, you use your whole boat to “shoot” the sight, swinging the bow ‘til it points straight at the landmark, then reading the bearing off the lubber line of the deck compass, while keeping both hands safely on your paddle the whole time.
Naturally, this raises the question: why not use only a deck compass? Well, because in a lot of situations it’s much easier — and more accurate — to orient your chart by rotating it on the deck of your sprayskirt until magnetic North is lined up with the needle on your hiker’s compass than it is to line up the longitude lines on the chart with your boat’s keel line and then pivot your entire kayak ‘til the declination-adjusted bearing shows on the lubber line of your deck compass. Plus, unlike a hiker’s compass, you can’t use a deck compass as a protractor to determine a bearing to follow from a chart or to plot a sight as a Line Of Position.
It’s easy to imagine the sea of confusion that could result from using one compass that is corrected for variation together with another that isn’t. It would be like trying to navigate while using imperial measurements for distance but metric units for speed. (Mixing systems like this went very poorly — and expensively — for NASA.) So what we want is the opposite of working with a declination-adjusted compass, where it’s all true North, all the time. Instead we want to work in all magnetic degrees, all the time. How do we do that?
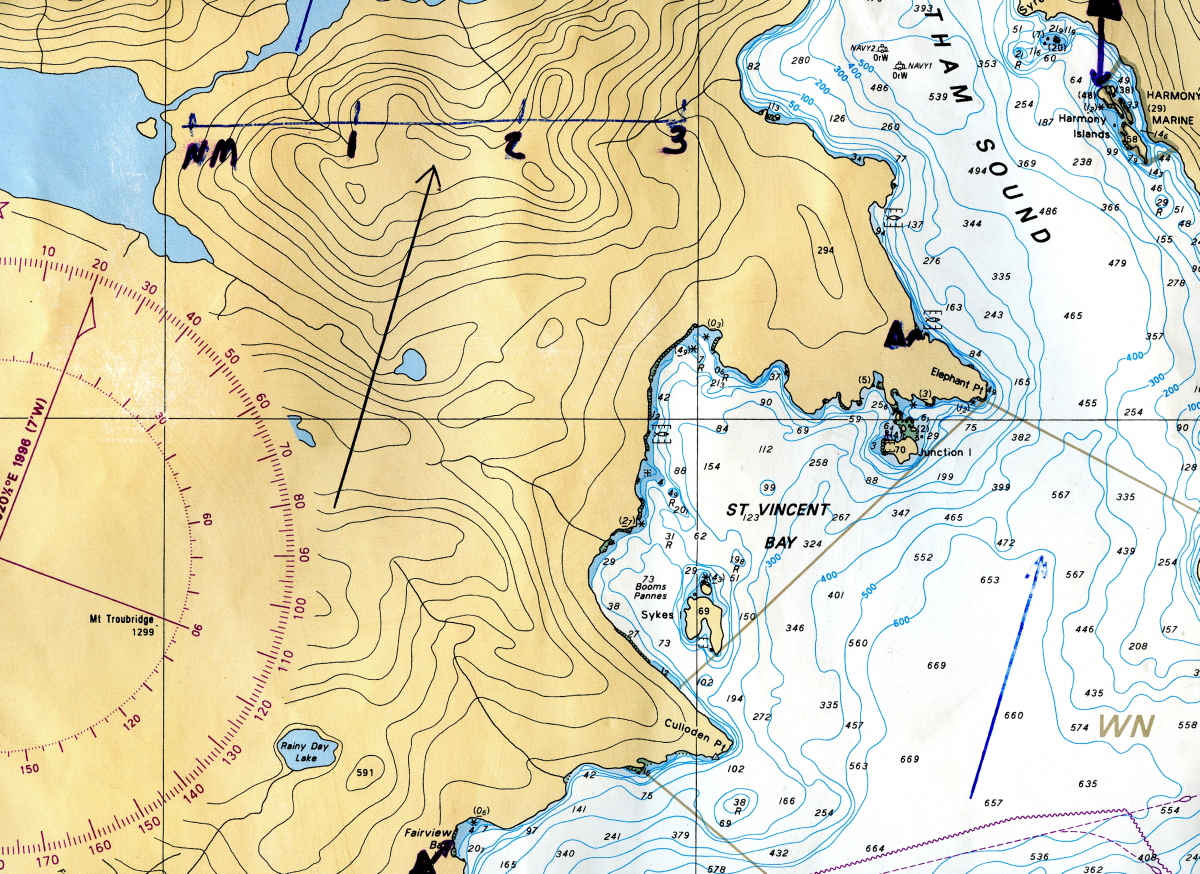
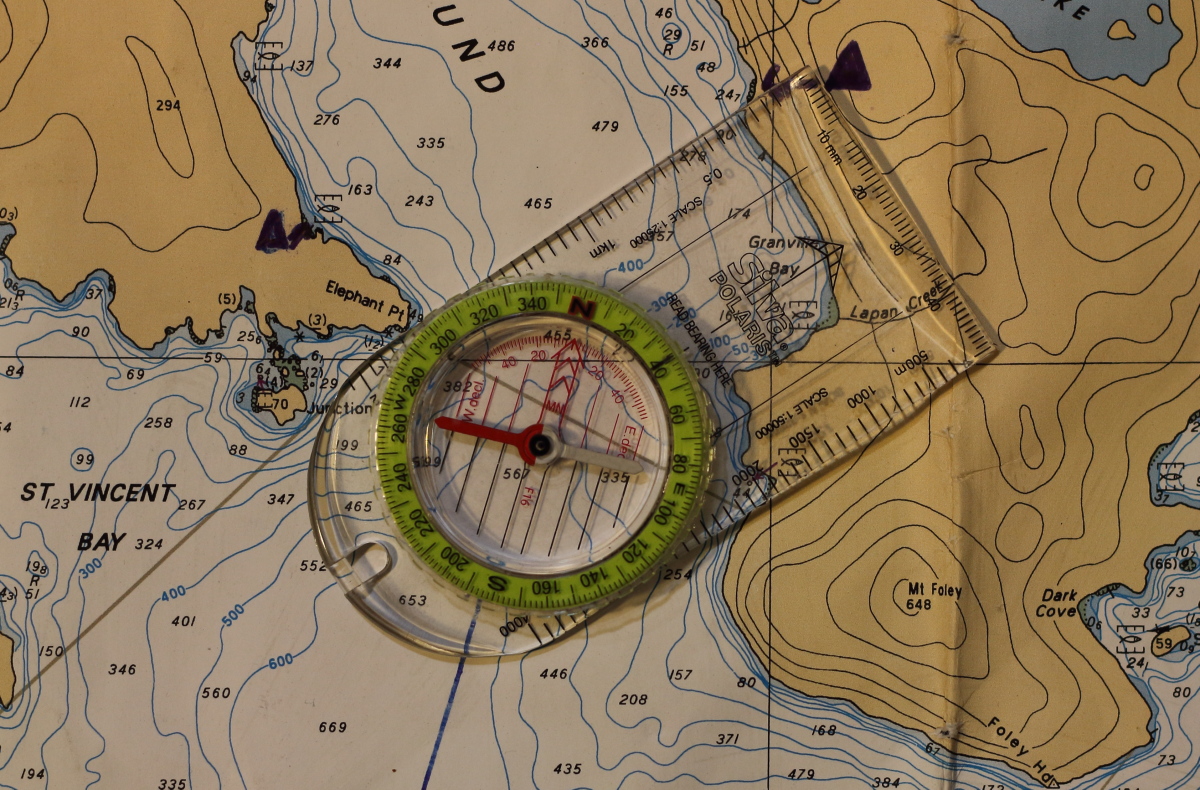
Decades ago, I came up with this method (though I’m sure I was not the first to think of it): lay parallel rules along the magnetic North line in the inner compass rose on a chart, then “walk” this line across all parts of the chart, drawing in magnetic North arrows so that no matter how the chart is folded in its protective bag, at least one of the arrows will be visible. If there’s been significant change in variation since the year shown on the inner compass rose, I instead lay out the corrected variation on the true North rose and walk that around the chart, marking the magnetic North arrows.
With this done, it’s simple to orient the chart with the compass, and to work out bearings and bring down sights all entirely in magnetic.
On a course several years back, I was introduced to the next-level version of this trick: rather than merely drawing random magnetic North arrows scattered across the chart, you draw a complete set of “magnetic longitude” lines, offset for variation from the true North longitude lines. This is easiest if you have access to a drafting table, but it’s possible to do with only parallel rules or even just a yardstick. (It’s hard to determine with certainty who originally came up with this clever idea, but at least in the Pacific Northwest, Blue Dog Dave is often credited with popularizing it. )

THE PLOT THICKENS
If you’re using just a basic hiker’s compass, without the extension of a folding sighting mirror, the baseplate may not reach far enough on a chart to either read off a bearing between your current location and your desired destination or to bring a sighting down as a Line Of Position to bisect the shoreline or other LOP.
One work-around popular with kayakers is a modified Douglas protractor. Drill a hole dead centre, insert a suitable length of synthetic and rot proof line, and tie it off with stopper knots so it doesn’t pull out. Keeping the sides parallel to the lines of longitude or the “magnetic” lines of longitude on your chart (depending on whether you’re working in “all True” or “all magnetic”), drop the protractor’s centre point over your current position, pull the string out to your desired destination and read the bearing off the scale. Reverse things for bringing down a sighting of a known object as a Line Of Position onto your chart.

There are a couple of other benefits to having a protractor separate from your compass. Firstly, the degree readings are more widely spaced and less squinty to read than on the tiny bezel of a hiker’s compass. Secondly, it reduces confusion about what you’re using the instrument for. When I’m teaching navigation in-person or online, students using a hiker’s compass to determine a bearing on a chart often imagine they also have to orient the chart and/or get “Fred in the shed” to get an accurate reading. In fact, it doesn’t matter at all where the chart or or the compass needle are pointing; you’re only using the compass baseplate and bezel as a protractor to determine an angle relative to whichever North you’re working with.
For additional info on sea kayak navigation, see this later post.
This discussion of ways to adapt compass navigation specifically to sea kayaking assumed the reader has a basic familiarity with concepts such as true vs. magnetic North, bearings, sightings, Lines Of Position, etc. If this is not the case for you, I highly recommend Navigation, Sea State & Weather: A Paddler’s Manual for an excellent concise introduction. If you want to take a deeper dive into the whole subject, Fundamentals Of Kayak Navigation is the definitive classic.

Hi Philip, great info on simplifying navigation/chart issues.
A question about deck compasses. Do you find the Ritchie colours (white on blue) easier to read than the Nexus/Brunton P70 (white on black). Aging eyes, glare, distance to compass,etc.
Thanks for your reply.
Brad
LikeLike
Hi Brad. Thanks for the kind words. Yes, I do find the white on blue easier to read; that’s why I have it on my rudder kayak, as shown in the picture. Unfortunately, many skeg boats, including my Valley Etain, come with a pre-molded compass bowl that only the Nexus/Brunton P70 fits.
LikeLike
Philip, that was a very clear, comprehensive presentation of the issues. Thank you.
But you might have missed one point. During one trip in the Broughtons, I discovered that my deck compass kept its same bearing regardless of the direction my kayak pointed.
Note to self: Do not put a drybag with metal camp components under the deck with the deck compass above it.
LikeLike
Hey Paul. Thanks for the kind words and glad it was helpful.
Re: metal components near deck compass: been there, done that (with a hatchet). The way I remember the difference between variation (the “natural” difference between true and magnetic North) and deviation is this: humans are deviants.
One of my winter projects is to write a complementary posting to this one showing how to bring down compass sights of real world objects to determine your position on a chart.
LikeLike
Philip, there is one situation with following a compass bearing that I recall was touched upon in one class, but in my experience with various route leaders, it seems not taken into account. I may not describe it exactly right, but I think you’ll get the idea. … If there is no current, then taking a bearing at point A and paddling straight to point B is natural and the shortest route. But if there is a current somewhat perpendicular to your travel (thinking of the passage between James and Washington Park, or maybe The sound end of Cypress crossing to Washington Park), then if you keep correcting your heading toward point B, you’ll be swept in an arc. It might be faster (less distance) to not adjust the bearing but to just cross and when you get to the other shore, then turn back to Point B (and maybe have a helpful eddy).
Leon of Body, Boat, Blade would give his students an exercise to cross obstruction pass. We’d all angle our boats to compensate for the current and ferry across. After everyone had a good head start, Leon would jump in his boat and paddle straight across. Of course, the current would push him down from Point B. But once on the other side of the passage, near the island, he’d turn and go straight along the shore to point B ( I think with the help of an eddy.
The topic does lean toward “route finding” but it also touches on following (or not) a compass bearing.
Though the compass seems old-fashioned in the world of GPS, on another outing with Washington Kayak Club, while padding in a morning fog, the group leader’s GPS ran out if battery. The “seocnd” was delighted to use her magnetic compass … “Batteries? We don’t need no stinking batteries!”
I made note that though a person may carry extra batteries, they don’t help if they are under the deck in a drybag.
LikeLike
Pingback: Sea Kayak Navigation: Plotting Your Position With A Compass | Kayakwriter's Blog
Pingback: Sea Kayak Navigation: natural ranges and pre-plotted LOPs | Kayakwriter's Blog
Pingback: Guiding Light: 2023 Jericho Beach Kayak staff trip to Halkomelem: səl̓ilw̓ət (Indian Arm) | Kayakwriter's Blog
Pingback: Sea Kayak Navigation: thoughts on GPSs and smartphone navigation apps | Kayakwriter's Blog
Pingback: Sea Kayak Navigation: LOPS at sea | Kayakwriter's Blog