
 I’ve been messing about with commercial and home-brew kayak sails for more than a decade, using them for both day trips and expeditions. After owning a Falcon Sail for nearly a year, here’s my take on the installation process (I’ll cover the sail’s performance in another post.)
To help you put my experiences in context, let me cop up front to being mechanically declined; I do a lot of hacks and mods to my kayaks, but I rarely get things exactly right the first time. So my first attempts at installing the sail involved many loud curses along the lines of “Come on, you Falcon thing!”
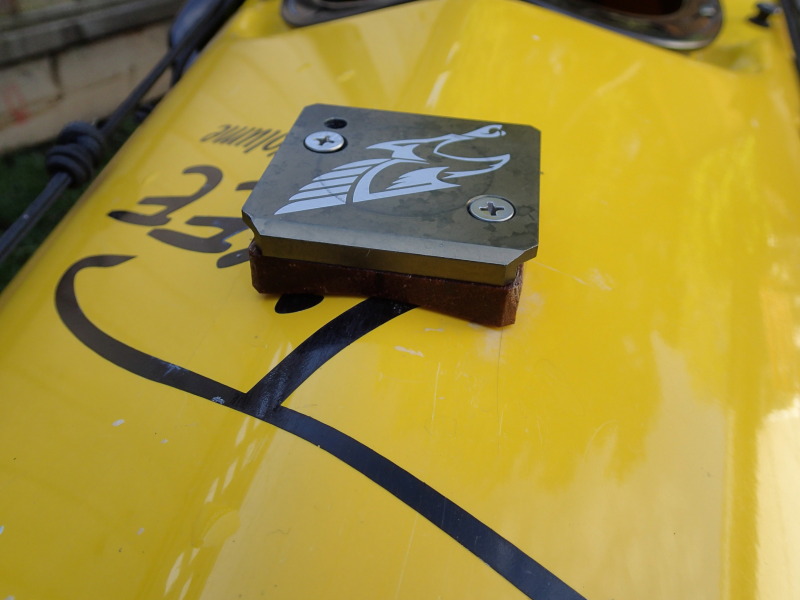 Nor do I have a complete home workshop, so I often improvise. Exhibit One: the Falcon Sail comes with a thin wooden adapter block that fits between the mast baseplate and your kayak deck. Falcon suggests using a band saw to profile the underside of the block to fit the deck contour. Lacking a band saw, I came up with what I thought was a cunning plan: I taped a sheet of coarse sandpaper face out on the deck and ran the block back and forth over it by hand. Aside from being unbelievably tedious, this method left a lot to be desired in the accuracy department, as this picture shows.
 The mast baseplate bolts to a matching plate on the underside of the deck. This lower plate holds a pivoting strut that rests against the keel to support the deck against the heavy downward pull of the mast stays. My work-around for filling the gap between the brace plate and the underside of the deck — turning the kayak upside down and molding in a blob of putty — was also pretty ghetto.
Ugly I could take, but not understrength. After a couple of experimental sails in light breezes, I made my first sea trials in a heavy wind. Strong gusts turned the mast into a long lever torquing from side to side against the deck. Under the strain, the thin layers of fibreglass and Kevlar folded and creased on the lee side, causing the mast to kneel. That in turn freed up slack in the stays and allowed the mast to collapse into the water. Since I was only a few hundred feet offshore, this was merely awkward; on a long crossing like the ones I make when touring, it could have been dangerous.
I reported my problems to Patrick at Falcon Sails. He’d always had plenty of time to answer my questions via email or phone when I was considering the purchase of his sail, (including making mounting placement suggestions based on the model of my kayak). That easy access didn’t stop now; he came through for me in a big way, clearly determined to help me make things work.

 At his suggestion, I used a profile gauge to measure the contour and slope of my foredeck. Based on pictures of these measurements, he made a custom plastic adapter plate for me. He also machined a wide block of okoume marine plywood to disperse the load on the underside of the deck, and provided a bag of wood flour to mix in with the epoxy for added strength when I laminated it to the underside of the deck.
Patrick calls this reinforced set-up an expedition rig. My recommendation if you’re installing the Falcon Sail on a composite kayak is to go with the expedition rig from the start; it’ll provide peace of mind and prevent the possible need for a do-over.
Before I did the re-installation, I also reinforced the underside of the deck with a couple of extra strips of fibreglass. They’re visible in this picture as the faintly darker band running between the two pairs of nuts and washers (which hold the pad eyes for the side stays).
Each customer cuts their underdeck strut to length to fit their individual boat, and Patrick’s instructions advise making it a really snug fit to provide maximum bracing. While shooting a demo video of my electric pump system recently, I noticed some water had seeped from my cockpit into the bow compartment; I suspect the continual upward push of the strut opened hairline cracks between the front bulkhead and the hull. (My kayak’s too new to be leaking like this otherwise.) This was easily fixed with a bead of sealant on both sides of the bulkhead. I doubt it would ever be a problem in wooden boats with their stronger bulkheads or plastic boats with their more flexible foam bulkheads.
I’ve been sailing with Installation 2.0 for months, in light and heavy winds, with the kayak empty and with it loaded for touring. The mast and sail have stood up to several practice self-rescues and one real combat capsize, so I’m confident the set-up is bombproof now.
So has my installation odyssey made you hesitate to order a Falcon Sail? Don’t! The right take-away isn’t that installing the Falcon Sail is way hard; it’s that even the minimally competent (like me) can do it, especially with Patrick’s superb after-sails support. Remember, even professional mariners need shakedown cruises to work the bugs out of new set-ups. And the results are well worth it, as we’ll see in Part Two of this review.
Notes:
I have no connection to Falcon Sails beyond being a happy customer.
A big shout-out to Rod Tait of Orca Boats for hooking me up with small quantities of the appropriate epoxy for laminating wood to fibreglass, which saved me from having to buy industrial size containers I’d never have finished in this lifetime.
Update: November 22, 2015
Patrick at Falcon Sails has advised me of several exciting developments:
Firstly, they’ll be revising the installation documentation to make the process clearer.
Secondly, they’ve replaced the teak adapter block with a PVC one. That will probably be much easier to shape with my outward-facing sandpaper hack (a trick Patrick will be sharing with future purchasers. He’ll even be shipping a sheet of sandpaper with the sail once he’s tested to find the optimum grit.) The PVC block can bonded and layered with the PVC cement you get from hardware stores for plastic plumbing. The teak adapter will still be available as an option for those who want it.
They’ll also offer the option of custom 3D printing an adapter block for you, if your boat deck is a outlier in shape (mine was apparently way more curved and peaked than the average.)
Patrick also advises that my boat needing the “expedition rig” was an anomaly caused by its ultra-light lay-up and highly peaked deck; in his experience only about one boat in twenty requires it.

Pingback: A Review Of The Falcon Kayak Sail. Part 2: Exhilaration | Kayakwriter's Blog
Hi, i have a Wilderness System Tarpon T160 (16 feet long) I would like to buy a Falcon Sails, What size do you recommend? please
LikeLike
I recommend you contact Falcon Sails directly and take their advice on sizes. They’ll probably not only ask about the size and type of boat you have, but also your sailing experience, whether you plan to sail it empty or loaded for touring, etc. etc. Happy sailing!
LikeLike