
The Why
There are valid reasons to always carry a hand pump when sea kayaking. In my home Canadian waters, a bailer of some sort is a legal requirement. If you’re assisting another paddler, a hand pump lets you empty the rescuee’s cockpit while leaving their sprayskirt fastened to keep out waves. It’s smart to have a manual back-up to electric devices. And I have successfully self-rescued using only a hand pump in moderate conditions. But when the surf really hits the fan, I don’t count on a hand pump alone to save my soggy ass.

My first generation electric kayak pump. The grey metal nozzle on the left side of the battery box is a pneumatic switch, activated by an air button at the far end of plastic tubing.
Picture it: you’ve had to wet-exit in breaking seas. You’ve reboarded, shaken and chilled. And now you’re supposed to spare at least one hand to pump while you fight to stay upright in conditions you couldn’t handle with an unflooded cockpit and both hands on your paddle? Really? Seriously? In large waves, just a few inches of water sloshing from side to side in the cockpit is incredibly destabilizing. This free surface effect can capsize even full-grown ships.

The pump in place. The air button is on deck at top left, and the water output port at top right.
That’s why I’ve outfitted my last two kayaks with electric pumps. They’ve worked every time I’ve had to do a combat self-rescue. And they’ve made solo surf launches much easier. Once I’ve dragged my boat into the shallows, some sneaky wave invariably dumps several gallons of brine into my cockpit before I can fasten my sprayskirt. Previously, I’d jam my hand pump down the skirt tunnel and get batted beam-side on against the beach by the next wave. The one after that would logroll me into the wash zone to huff sand soup. These days, I just flick on the electric pump, paddle to keep the bow into the waves as the cockpit empties, and then make my breakout. Once beyond the break, I use my hand pump to mop up whatever seawater the electric pump missed.

After my first air switch jammed with sand, I created this see-through cover for the replacement.
So if electric pumps are that awesome, why don’t they come as standard equipment on sea kayaks? Based on my experience in outdoor retail, I’ll suggest three reasons:
First, an electric pump would add at least a couple of hundred dollars to an already big ticket item. No manufacturer wants their boats to retail for more than a competitor’s pump-less models.
Secondly, electric pumps require some ongoing maintenance. In our litigious North American society, it’s easy to imagine a paddler neglecting an electric pump for years, it failing at the moment of need, and lawsuits ensuing.
Finally, for many casual paddlers, an electric pump is overkill; in the conditions they’ll be paddling, a hand pump will be perfectly adequate. Why would they want to pay for the full “off-road package” when they’re only doing light daytripping?
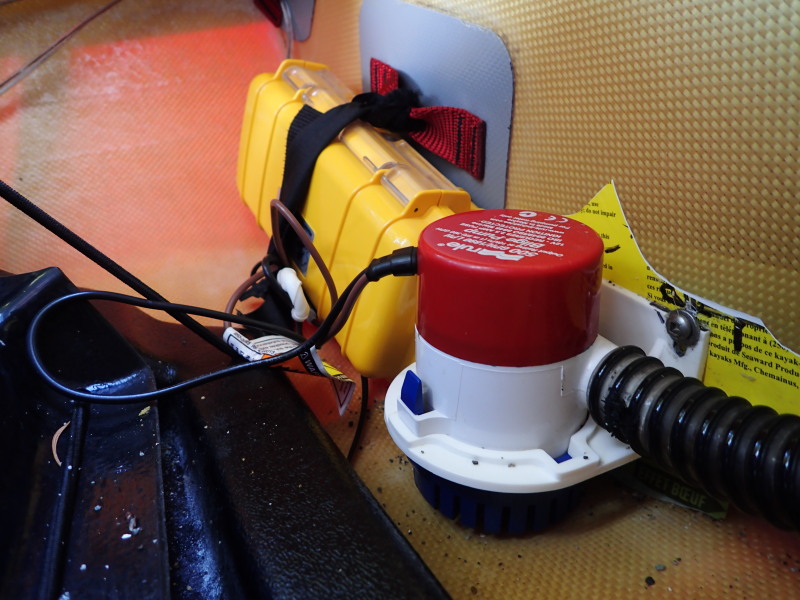
My second-generation electric kayak pump. It’s held in place by an optional bracket bolted through the bulkhead.
The How
The fact that electric kayak pumps are a niche market probably also explains why at least two companies that offered after-market pump kits — Bluewater Kayak Works and Rapid Runner — don’t appear to be above water anymore. So if you want an electric kayak pump, you’ll likely have to roll your own. Fortunately, that’s pretty easy (as it must be if I’ve done it successfully twice.)
First up, you need a 12-volt electric bilge pump, available at marine stores. Sea kayak forums are rife with debates about whether it’s better to have a higher-output pump that drains the cockpit (and the battery) faster, or a lower-output model that’s slower but will empty the cockpit more times before depleting the battery. I’m sure you can construct some scenarios in which faster/fewer is the best choice and others where slower/more wins out; you pays your money and you takes your choice. For my most recent system I picked a Rule 500 pump because its compact size fit the limited space behind the seat of my new boat and it because offered a good balance of speed and battery economy.
Next, you need a 12-volt battery system. Some kayakers prefer a single SLA (sealed lead acid) battery. On both my systems, I opted for rechargeable AA batteries. They hold a bit less juice, but on tour I usually have solar panels and/or a stove top recharger, and I like being able to recharge batteries in the field if required. (If you do go with AAs, look for a type with a low self-discharge rate so you’ll only need to charge them once or twice a year rather than every few weeks.)

The battery box for my second generation pump. The clip resting on the lid is for by-passing the 4AA case when using the pump with alkalines.
Remember that a rechargeable AA battery puts out only 1.2 volts, in contrast to an alkaline AA’s 1.5 volts. That means that when you stack AAs in series you’ll want at least 10, and preferably 12, to put out enough voltage. On my latest system, I used a combination of an 8 AA battery case and a 4 AA case. With rechargeables, I run both cases in series to put out 14.4 volts. But if necessary, I can load the 8 AA case alone with alkalines scrounged from my LED lantern and other gadgets, and by-pass the 4 AA case by clipping on a gizmo I made from a 9-volt battery clip.
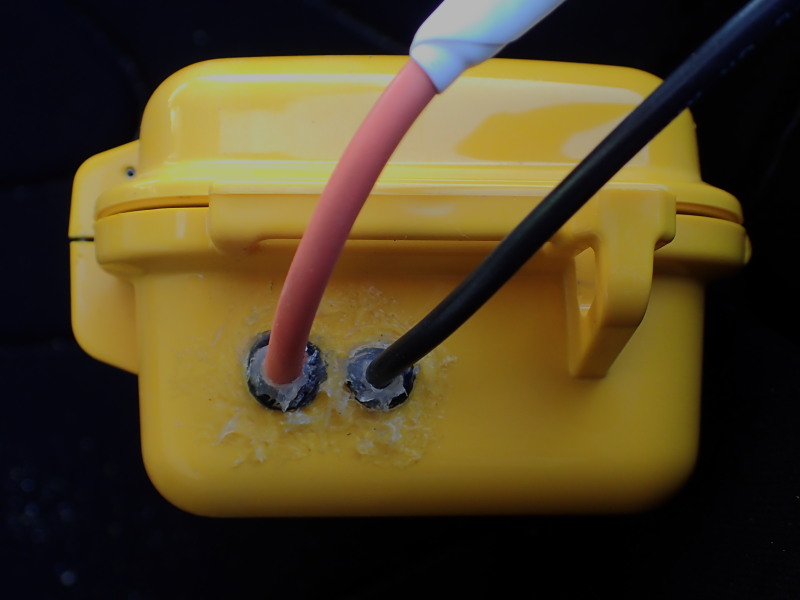 Whatever battery set-up you opt for, you’ll need to house it in something waterproof. Pelican’s Micro Cases are a popular choice. Inside the box is also the best place for the in-line fuse holder (and a spare fuse). Where the wires pass through the wall of the case, I drilled the smallest possible holes, slipped in the snuggest marine-grade grommets that fit, and filled the joint and surrounding area with marine sealant for good measure. I waterproofed the soldered wire splices between battery, pump and switch with heat shrink tubing and generous wraps of ResQ-tape.
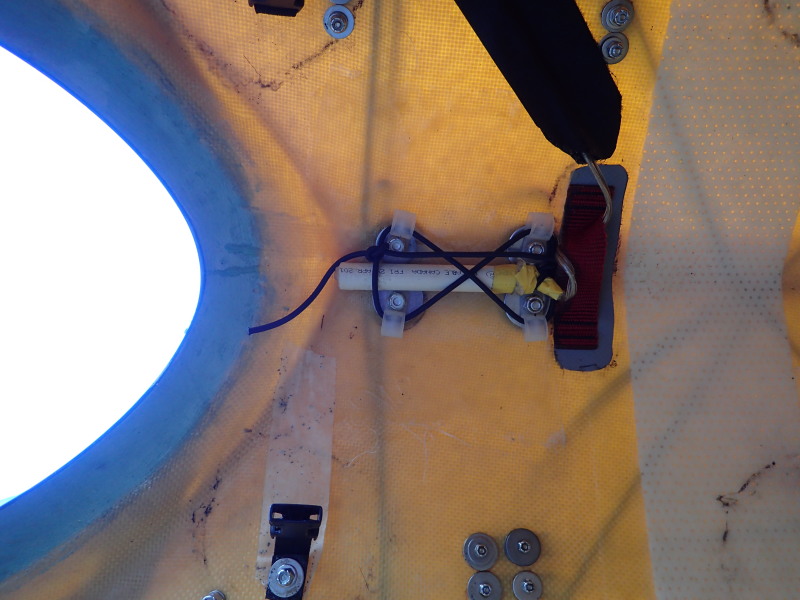
Protected inside a length of PVC pipe, the magnetic reed switch is tied under the deck peak.
The switch is the last of the big three components. For my current system, I borrowed the idea of a magnetic reed switch from other home-brew pump builders. This little glass-housed switch is “normally open” — that is, turned off. Bringing a magnet within range closes it and turns on the pump. Once I’d soldered the wires to either end, I slipped the fragile switch inside a short length of PVC pipe and “potted” it with GOOP Marine for waterproofness and shock absorption. I mounted it right up under the eaves of my peaked foredeck, where it won’t be dislodged by my clumsy feet as I enter or exit the boat. (Happily, I was able to splice it in place by weaving shockcord onto the nuts and washers of a Scotty fixture I already had bolted on my deck to hold a sail or a camera mount.)
 For the switch activator, I glued a couple of rare earth magnets from Lee Valley into a little pill/food container, then drilled a tunnel through the sides for threading onto my deck shockcord.
 Finally, you’ll also need some hose and a mushroom head of the appropriate diameter for your pump. There are fancy fittings with one-way flap valves available, but I’ve found this little plug, home brewed by wrapping foam and tape around a tether cord, works fine. Experiment with the plug diameter until it’s snug enough keep out waves, but loose enough that the push of the activated pump can pop it out.
So how well does the finished system work? Judge for yourself: this video was taken in the fall. The batteries had been charged once in the spring, used for several practice bailouts and one for-real self-rescue, and were still kicking it strong.
For more information and inspiration, check out this post.

Pingback: A sail, a swim and a kayak self-rescue: doing the paddle float re-entry for real | Kayakwriter's Blog
Pingback: A Review of the Falcon Kayak Sail. Part 1: Installation | Kayakwriter's Blog
Pingback: Electric Pump for Sea Kayak, Mark III | Kayakwriter's Blog
Pingback: Electric Bilge Pumps For Sea Kayaks: The Saga Continues | Kayakwriter's Blog